Using uv in GitHub ActionsGitHub Actionsでのuvの使用
Installationインストール
For use with GitHub Actions, we recommend the official
astral-sh/setup-uv action, which installs uv, adds it to
PATH, (optionally) persists the cache, and more, with support for all uv-supported platforms.GitHub Actionsで使用するには、公式の
astral-sh/setup-uvアクションを推奨します。これにより、uvがインストールされ、PATHに追加され、(オプションで)キャッシュが保持され、さらにuvがサポートするすべてのプラットフォームに対応します。
To install the latest version of uv:最新のuvバージョンをインストールするには:
name: Example

jobs:
  uv-example:
    name: python
    runs-on: ubuntu-latest

    steps:
      - uses: actions/checkout@v5

      - name: Install uv
        uses: astral-sh/setup-uv@v7
It is considered best practice to pin to a specific uv version, e.g., with:特定のuvバージョンに固定することがベストプラクティスとされています。例えば、次のように:
name: Example

jobs:
  uv-example:
    name: python
    runs-on: ubuntu-latest

    steps:
      - uses: actions/checkout@v5

      - name: Install uv
        uses: astral-sh/setup-uv@v7
        with:
          # Install a specific version of uv.
          version: "0.9.13"
Setting up PythonPythonの設定
Python can be installed with the python install command:Pythonはpython installコマンドでインストールできます:
name: Example

jobs:
  uv-example:
    name: python
    runs-on: ubuntu-latest

    steps:
      - uses: actions/checkout@v5

      - name: Install uv
        uses: astral-sh/setup-uv@v7

      - name: Set up Python
        run: uv python install
This will respect the Python version pinned in the project.これにより、プロジェクトに固定されたPythonバージョンが尊重されます。
Alternatively, the official GitHub setup-python action can be used. This can be faster, because
GitHub caches the Python versions alongside the runner.また、公式のGitHub setup-pythonアクションを使用することもできます。これは、GitHubがランナーとともにPythonバージョンをキャッシュするため、より高速です。
Set the
python-version-file
option to use the pinned version for the project:プロジェクトのために固定されたバージョンを使用するには、
python-version-file
オプションを設定します:
name: Example

jobs:
  uv-example:
    name: python
    runs-on: ubuntu-latest

    steps:
      - uses: actions/checkout@v5

      - name: "Set up Python"
        uses: actions/setup-python@v6
        with:
          python-version-file: ".python-version"

      - name: Install uv
        uses: astral-sh/setup-uv@v7
Or, specify the pyproject.toml file to ignore the pin and use the latest version compatible with
the project's requires-python constraint:または、pyproject.tomlファイルを指定してピンを無視し、プロジェクトのrequires-python制約に互換性のある最新バージョンを使用します:
name: Example

jobs:
  uv-example:
    name: python
    runs-on: ubuntu-latest

    steps:
      - uses: actions/checkout@v5

      - name: "Set up Python"
        uses: actions/setup-python@v6
        with:
          python-version-file: "pyproject.toml"

      - name: Install uv
        uses: astral-sh/setup-uv@v7
Multiple Python versions複数のPythonバージョン
When using a matrix to test multiple Python versions, set the Python version using
astral-sh/setup-uv, which will override the Python version specification in the pyproject.toml
or .python-version files:複数のPythonバージョンをテストするためにマトリックスを使用する場合は、astral-sh/setup-uvを使用してPythonバージョンを設定します。これにより、pyproject.tomlまたは.python-versionファイルのPythonバージョン指定が上書きされます:
jobs:
  build:
    name: continuous-integration
    runs-on: ubuntu-latest
    strategy:
      matrix:
        python-version:
          - "3.10"
          - "3.11"
          - "3.12"

    steps:
      - uses: actions/checkout@v5

      - name: Install uv and set the Python version
        uses: astral-sh/setup-uv@v7
        with:
          python-version: ${{ matrix.python-version }}
If not using the setup-uv action, you can set the UV_PYTHON environment variable:setup-uvアクションを使用しない場合は、UV_PYTHON環境変数を設定できます:
jobs:
  build:
    name: continuous-integration
    runs-on: ubuntu-latest
    strategy:
      matrix:
        python-version:
          - "3.10"
          - "3.11"
          - "3.12"
    env:
      UV_PYTHON: ${{ matrix.python-version }}
    steps:
      - uses: actions/checkout@v5
Syncing and running同期と実行
Once uv and Python are installed, the project can be installed with uv sync and commands can be
run in the environment with uv run:uvとPythonがインストールされたら、プロジェクトはuv syncでインストールでき、uv runで環境内でコマンドを実行できます:
name: Example

jobs:
  uv-example:
    name: python
    runs-on: ubuntu-latest

    steps:
      - uses: actions/checkout@v5

      - name: Install uv
        uses: astral-sh/setup-uv@v7

      - name: Install the project
        run: uv sync --locked --all-extras --dev

      - name: Run tests
        # For example, using `pytest`
        run: uv run pytest tests
Tipヒント
The
UV_PROJECT_ENVIRONMENT setting can
be used to install to the system Python environment instead of creating a virtual environment.この
UV_PROJECT_ENVIRONMENT 設定は、仮想環境を作成する代わりにシステムのPython環境にインストールするために使用できます。
Cachingキャッシング
It may improve CI times to store uv's cache across workflow runs.CIの時間を改善するために、uvのキャッシュをワークフローの実行間で保存することができます。
The astral-sh/setup-uv has built-in support for
persisting the cache:astral-sh/setup-uv は、キャッシュを永続化するための組み込みサポートを提供しています:
Alternatively, you can manage the cache manually with the actions/cache action:または、actions/cache アクションを使用してキャッシュを手動で管理することもできます:
jobs:
  install_job:
    env:
      # Configure a constant location for the uv cache
      UV_CACHE_DIR: /tmp/.uv-cache

    steps:
      # ... setup up Python and uv ...

      - name: Restore uv cache
        uses: actions/cache@v4
        with:
          path: /tmp/.uv-cache
          key: uv-${{ runner.os }}-${{ hashFiles('uv.lock') }}
          restore-keys: |
            uv-${{ runner.os }}-${{ hashFiles('uv.lock') }}
            uv-${{ runner.os }}

      # ... install packages, run tests, etc ...

      - name: Minimize uv cache
        run: uv cache prune --ci
The uv cache prune --ci command is used to reduce the size of the cache and is optimized for CI.
Its effect on performance is dependent on the packages being installed.uv cache prune --ci コマンドは、キャッシュのサイズを削減するために使用され、CIに最適化されています。
そのパフォーマンスへの影響は、インストールされるパッケージに依存します。
Tipヒント
If using uv pip, use requirements.txt instead of uv.lock in the cache key.uv pip を使用する場合、キャッシュキーには uv.lock の代わりに requirements.txt を使用してください。
Note注意
When using non-ephemeral, self-hosted runners the default cache directory can grow unbounded. In this case, it may not be optimal to share the cache between jobs. Instead, move the cache inside the GitHub Workspace and remove it once the job finishes using a Post Job Hook.一時的でない自己ホスト型ランナーを使用する場合、デフォルトのキャッシュディレクトリは無制限に成長する可能性があります。 この場合、ジョブ間でキャッシュを共有することは最適ではないかもしれません。代わりに、キャッシュを GitHubワークスペース内に移動し、ジョブが終了したらPost Job Hookを使用して削除してください。
install_job:
  env:
    # Configure a relative location for the uv cache
    UV_CACHE_DIR: ${{ github.workspace }}/.cache/uv
Using a post job hook requires setting the ACTIONS_RUNNER_HOOK_JOB_STARTED environment
variable on the self-hosted runner to the path of a cleanup script such as the one shown below.ポストジョブフックを使用するには、自己ホスト型ランナーで ACTIONS_RUNNER_HOOK_JOB_STARTED 環境変数をクリーンアップスクリプトのパスに設定する必要があります。以下に示すようなスクリプトです。
Using uv pipUsing uv pip
If using the uv pip interface instead of the uv project interface, uv requires a virtual
environment by default. To allow installing packages into the system environment, use the --system
flag on all uv invocations or set the UV_SYSTEM_PYTHON variable.uv pip インターフェースを使用する場合、デフォルトではuvは仮想環境を必要とします。システム環境にパッケージをインストールできるようにするには、すべての uv 呼び出しに --system フラグを使用するか、UV_SYSTEM_PYTHON 変数を設定してください。
The UV_SYSTEM_PYTHON variable can be defined in at different scopes.UV_SYSTEM_PYTHON 変数は、異なるスコープで定義できます。
Opt-in for the entire workflow by defining it at the top level:最上位で定義することで、ワークフロー全体にオプトインします:
Or, opt-in for a specific job in the workflow:または、ワークフロー内の特定のジョブにオプトインします:
Or, opt-in for a specific step in a job:または、ジョブ内の特定のステップにオプトインします:
steps:
  - name: Install requirements
    run: uv pip install -r requirements.txt
    env:
      UV_SYSTEM_PYTHON: 1
To opt-out again, the --no-system flag can be used in any uv invocation.再度オプトアウトするには、任意の uv 呼び出しで --no-system フラグを使用できます。
Private reposプライベートリポジトリ
If your project has dependencies on private GitHub repositories, you will need to configure a personal access token (PAT) to allow uv to fetch them.プロジェクトがプライベート GitHub リポジトリに依存している場合、uv がそれらを取得できるようにするために、パーソナルアクセストークン (PAT)を設定する必要があります。
After creating a PAT that has read access to the private repositories, add it as a repository secret.プライベートリポジトリへの読み取りアクセスを持つ PAT を作成した後、それを リポジトリシークレットとして追加します。
Then, you can use the gh CLI (which is installed in GitHub Actions
runners by default) to configure a
credential helper for Git to use the
PAT for queries to repositories hosted on github.com.その後、gh CLI(デフォルトで GitHub Actions ランナーにインストールされています)を使用して、Git のための資格情報ヘルパーを設定し、github.com にホストされているリポジトリへのクエリに PAT を使用します。
For example, if you called your repository secret MY_PAT:例えば、リポジトリシークレットを MY_PAT と呼んだ場合:
steps:
  - name: Register the personal access token
    run: echo "${{ secrets.MY_PAT }}" | gh auth login --with-token
  - name: Configure the Git credential helper
    run: gh auth setup-git
Publishing to PyPIPyPIへの公開
uv can be used to build and publish your package to PyPI from GitHub Actions. We provide a standalone example alongside this guide in astral-sh/trusted-publishing-examples. The workflow uses trusted publishing, so no credentials need to be configured.uvを使用して、GitHub ActionsからパッケージをビルドしてPyPIに公開できます。このガイドに沿ったスタンドアロンの例を、 astral-sh/trusted-publishing-examplesで提供しています。 ワークフローはtrusted publishingを使用しているため、認証情報を 設定する必要はありません。
In the example workflow, we use a script to test that the source distribution and the wheel are both functional and we didn't miss any files. This step is recommended, but optional.例のワークフローでは、ソース配布とホイールの両方が機能していることをテストするスクリプトを使用し、ファイルを見逃していないことを確認します。このステップは推奨されますが、任意です。
First, add a release workflow to your project:まず、プロジェクトにリリースワークフローを追加します:
name: "Publish"

on:
  push:
    tags:
      # Publish on any tag starting with a `v`, e.g., v0.1.0
      - v*

jobs:
  run:
    runs-on: ubuntu-latest
    environment:
      name: pypi
    permissions:
      id-token: write
      contents: read
    steps:
      - name: Checkout
        uses: actions/checkout@v5
      - name: Install uv
        uses: astral-sh/setup-uv@v7
      - name: Install Python 3.13
        run: uv python install 3.13
      - name: Build
        run: uv build
      # Check that basic features work and we didn't miss to include crucial files
      - name: Smoke test (wheel)
        run: uv run --isolated --no-project --with dist/*.whl tests/smoke_test.py
      - name: Smoke test (source distribution)
        run: uv run --isolated --no-project --with dist/*.tar.gz tests/smoke_test.py
      - name: Publish
        run: uv publish
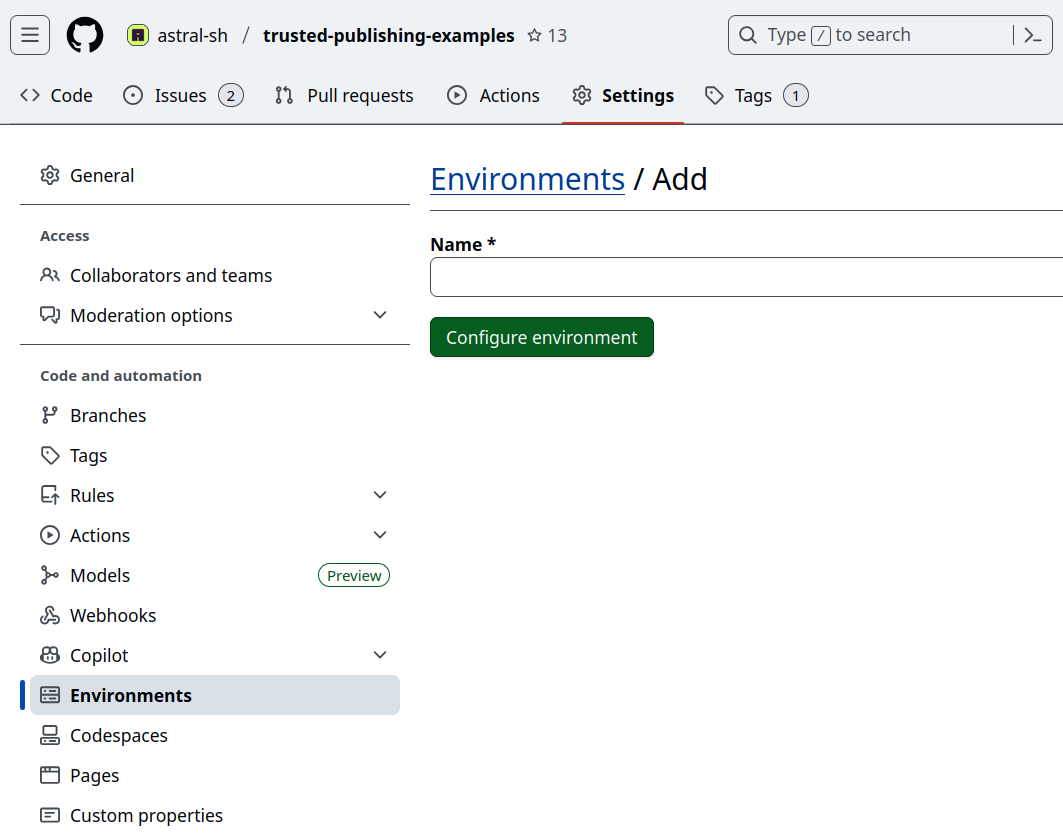
Then, create the environment defined in the workflow in the GitHub repository under "Settings" -> "Environments".次に、GitHubリポジトリの「Settings」->「Environments」でワークフローで定義された環境を作成します。
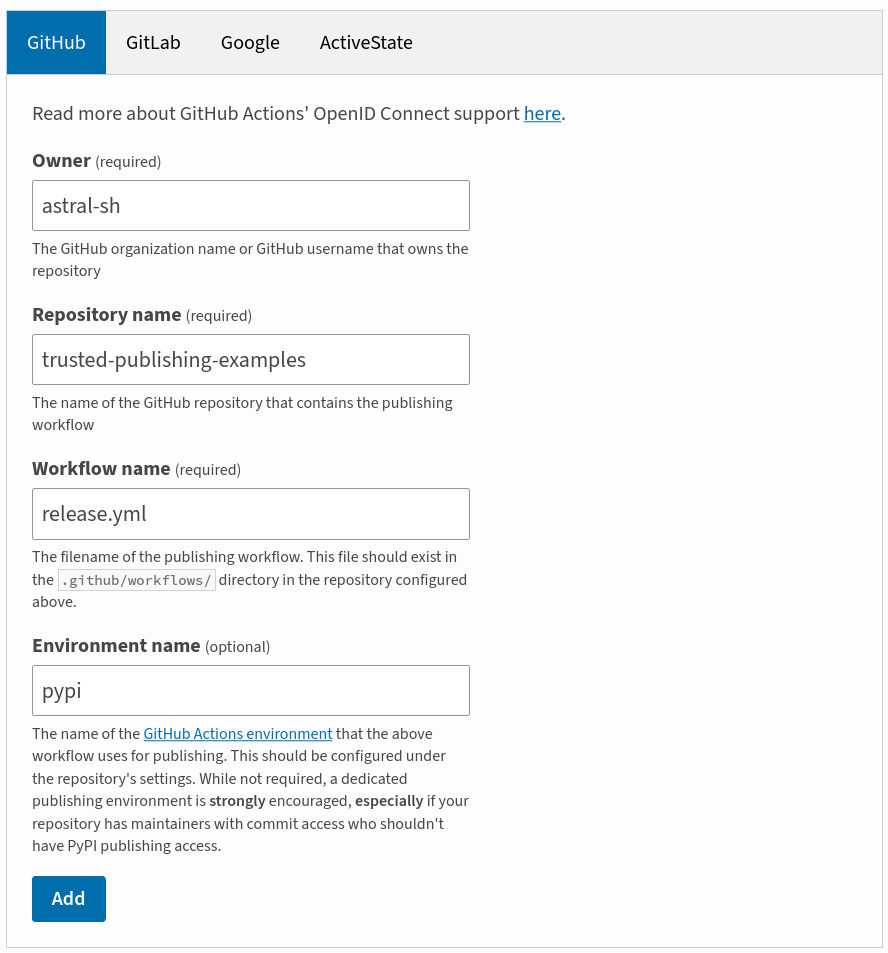
Add a trusted publisher to your PyPI project in the project settings under "Publishing". Ensure that all fields match with your GitHub configuration.trusted publisherをPyPIプロジェクトのプロジェクト設定の「Publishing」セクションに追加します。すべてのフィールドがGitHubの設定と一致していることを確認してください。
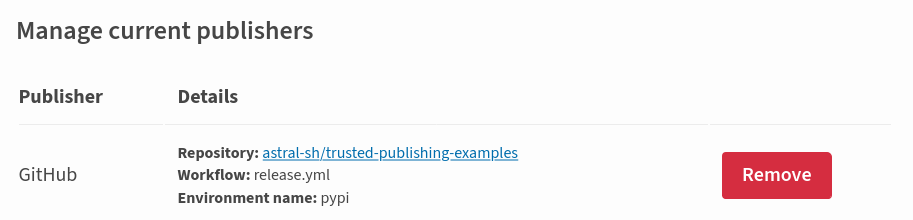
After saving:保存後:
Finally, tag a release and push it. Make sure it starts with v to match the pattern in the
workflow.最後に、リリースにタグを付けてプッシュします。ワークフローのパターンに一致するように、vで始まることを確認してください。