Multi-stage buildsマルチステージビルド
Explanation説明
In a traditional build, all build instructions are executed in sequence, and in a single build container: downloading dependencies, compiling code, and packaging the application. All those layers end up in your final image. This approach works, but it leads to bulky images carrying unnecessary weight and increasing your security risks. This is where multi-stage builds come in.従来のビルドでは、すべてのビルド指示が順番に実行され、単一のビルドコンテナ内で依存関係のダウンロード、コードのコンパイル、アプリケーションのパッケージ化が行われます。これらのすべてのレイヤーが最終的なイメージに含まれます。このアプローチは機能しますが、不要な重さを持つ大きなイメージを生み出し、セキュリティリスクを増加させます。ここでマルチステージビルドが登場します。
Multi-stage builds introduce multiple stages in your Dockerfile, each with a specific purpose. Think of it like the ability to run different parts of a build in multiple different environments, concurrently. By separating the build environment from the final runtime environment, you can significantly reduce the image size and attack surface. This is especially beneficial for applications with large build dependencies.マルチステージビルドは、Dockerfile内に特定の目的を持つ複数のステージを導入します。これは、異なる環境でビルドの異なる部分を同時に実行する能力のように考えることができます。ビルド環境を最終的なランタイム環境から分離することで、イメージサイズと攻撃面を大幅に削減できます。これは、大きなビルド依存関係を持つアプリケーションに特に有益です。
Multi-stage builds are recommended for all types of applications.マルチステージビルドは、すべての種類のアプリケーションに推奨されます。
- For interpreted languages, like JavaScript or Ruby or Python, you can build and minify your code in one stage, and copy the production-ready files to a smaller runtime image. This optimizes your image for deployment.JavaScriptやRuby、Pythonのようなインタプリタ型言語の場合、コードを1段階でビルドおよびミニファイし、プロダクション準備が整ったファイルを小さなランタイムイメージにコピーできます。これにより、デプロイメント用にイメージが最適化されます。
- For compiled languages, like C or Go or Rust, multi-stage builds let you compile in one stage and copy the compiled binaries into a final runtime image. No need to bundle the entire compiler in your final image.CやGo、Rustのようなコンパイル型言語の場合、マルチステージビルドを使用すると、1段階でコンパイルし、コンパイルされたバイナリを最終的なランタイムイメージにコピーできます。最終イメージにコンパイラ全体をバンドルする必要はありません。
Here's a simplified example of a multi-stage build structure using pseudo-code. Notice there are multiple FROM statements and a new AS <stage-name>. In addition, the COPY statement in the second stage is copying --from the previous stage.以下は、擬似コードを使用したマルチステージビルド構造の簡略化された例です。複数の FROM ステートメントと新しい AS <stage-name> があることに注意してください。さらに、2番目のステージの COPY ステートメントは、前のステージから --from をコピーしています。
# Stage 1: Build Environment
FROM builder-image AS build-stage
# Install build tools (e.g., Maven, Gradle)
# Copy source code
# Build commands (e.g., compile, package)

# Stage 2: Runtime environment
FROM runtime-image AS final-stage
#  Copy application artifacts from the build stage (e.g., JAR file)
COPY --from=build-stage /path/in/build/stage /path/to/place/in/final/stage
# Define runtime configuration (e.g., CMD, ENTRYPOINT)
This Dockerfile uses two stages:このDockerfileは2つのステージを使用しています:
- The build stage uses a base image containing build tools needed to compile your application. It includes commands to install build tools, copy source code, and execute build commands.ビルドステージは、アプリケーションをコンパイルするために必要なビルドツールを含むベースイメージを使用します。ビルドツールをインストールし、ソースコードをコピーし、ビルドコマンドを実行するためのコマンドが含まれています。
- The final stage uses a smaller base image suitable for running your application. It copies the compiled artifacts (a JAR file, for example) from the build stage. Finally, it defines the runtime configuration (using
CMDorENTRYPOINT) for starting your application.最終ステージは、アプリケーションを実行するのに適した小さなベースイメージを使用します。ビルドステージからコンパイルされたアーティファクト(例えばJARファイル)をコピーします。最後に、アプリケーションを起動するためのランタイム構成(CMDまたはENTRYPOINTを使用)を定義します。
Try it out試してみる
In this hands-on guide, you'll unlock the power of multi-stage builds to create lean and efficient Docker images for a sample Java application. You'll use a simple “Hello World” Spring Boot-based application built with Maven as your example.このハンズオンガイドでは、マルチステージビルドの力を解き放ち、サンプルJavaアプリケーションのためにスリムで効率的なDockerイメージを作成します。Mavenで構築されたシンプルな「Hello World」Spring Bootベースのアプリケーションを例として使用します。
Download and install Docker Desktop.Docker Desktopをダウンロードしてインストールします。
Open this pre-initialized project to generate a ZIP file. Here’s how that looks:この 事前初期化されたプロジェクトを開いてZIPファイルを生成します。これがその見た目です:
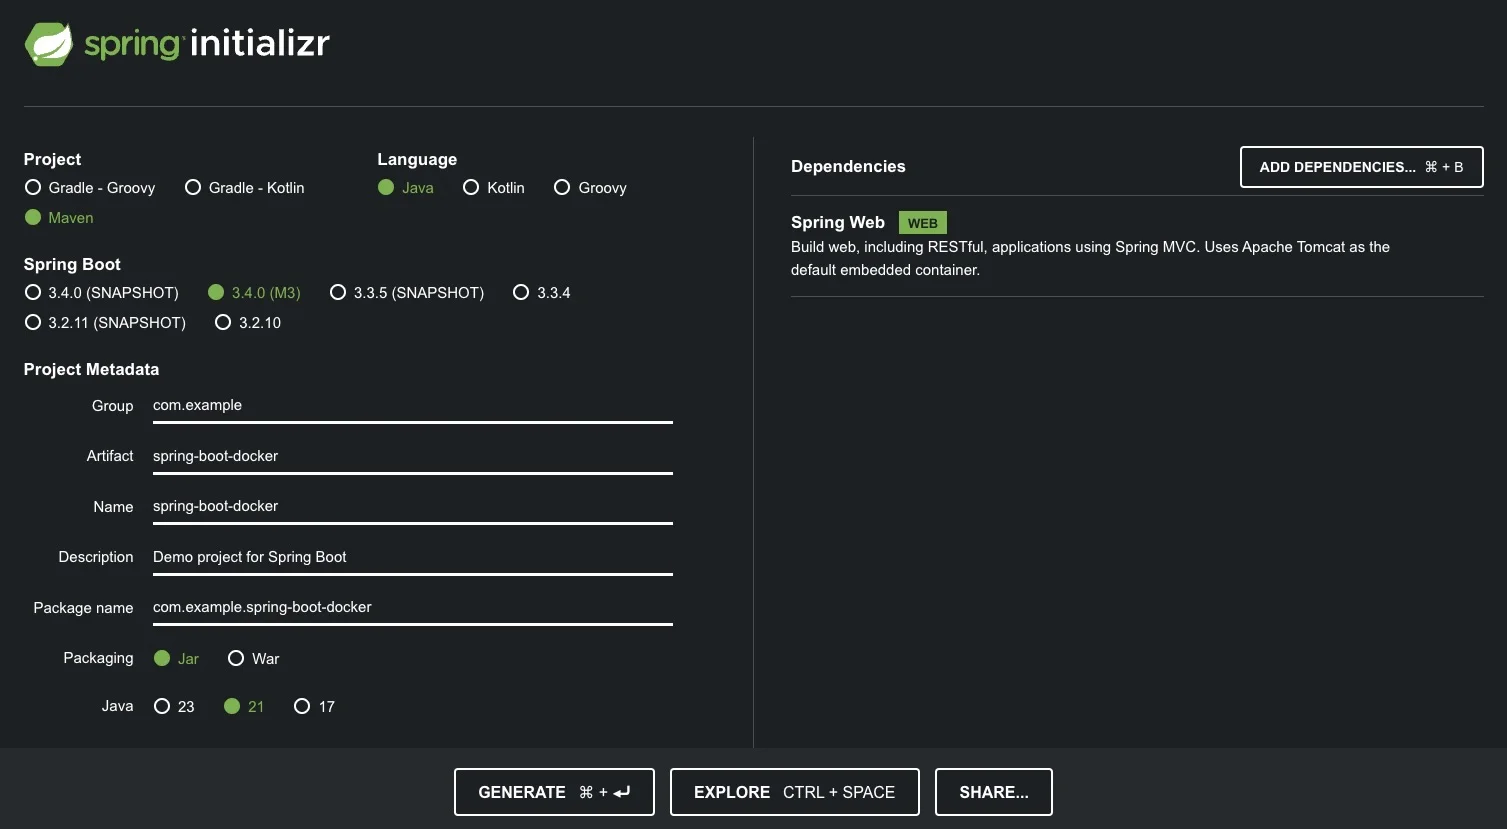
Spring Initializr is a quickstart generator for Spring projects. It provides an extensible API to generate JVM-based projects with implementations for several common concepts — like basic language generation for Java, Kotlin, and Groovy.Spring Initializr は、Springプロジェクトのためのクイックスタートジェネレーターです。Java、Kotlin、Groovyの基本的な言語生成など、いくつかの一般的な概念の実装を持つJVMベースのプロジェクトを生成するための拡張可能なAPIを提供します。
Select Generate to create and download the zip file for this project.Generate を選択して、このプロジェクトのZIPファイルを作成してダウンロードします。
For this demonstration, you’ve paired Maven build automation with Java, a Spring Web dependency, and Java 21 for your metadata.このデモでは、Mavenビルド自動化をJava、Spring Web依存関係、およびJava 21と組み合わせています。
Navigate the project directory. Once you unzip the file, you'll see the following project directory structure:プロジェクトディレクトリに移動します。ファイルを解凍すると、次のプロジェクトディレクトリ構造が表示されます:
spring-boot-docker
├── HELP.md
├── mvnw
├── mvnw.cmd
├── pom.xml
└── src
    ├── main
    │   ├── java
    │   │   └── com
    │   │       └── example
    │   │           └── spring_boot_docker
    │   │               └── SpringBootDockerApplication.java
    │   └── resources
    │       ├── application.properties
    │       ├── static
    │       └── templates
    └── test
        └── java
            └── com
                └── example
                    └── spring_boot_docker
                        └── SpringBootDockerApplicationTests.java

15 directories, 7 files
The
src/main/javadirectory contains your project's source code, thesrc/test/javadirectory
contains the test source, and thepom.xmlfile is your project’s Project Object Model (POM).ディレクトリsrc/main/javaにはプロジェクトのソースコードが含まれ、src/test/javaディレクトリ
にはテストソースが含まれ、pom.xmlファイルはプロジェクトのプロジェクトオブジェクトモデル(POM)です。The
pom.xmlfile is the core of a Maven project's configuration. It's a single configuration file that
contains most of the information needed to build a customized project. The POM is huge and can seem
daunting. Thankfully, you don't yet need to understand every intricacy to use it effectively.pom.xmlファイルはMavenプロジェクトの設定の中心です。これは、カスタマイズされたプロジェクトをビルドするために必要な情報のほとんどを含む単一の設定ファイルです。POMは非常に大きく、圧倒されることがあります。幸いなことに、効果的に使用するためにすべての詳細を理解する必要はありません。Create a RESTful web service that displays "Hello World!"."Hello World!"を表示するRESTfulウェブサービスを作成します。
Under the
src/main/java/com/example/spring_boot_docker/directory, you can modify yourSpringBootDockerApplication.javafile with the following content:src/main/java/com/example/spring_boot_docker/ディレクトリの下で、次の内容でSpringBootDockerApplication.javaファイルを修正できます:package com.example.spring_boot_docker; import org.springframework.boot.SpringApplication; import org.springframework.boot.autoconfigure.SpringBootApplication; import org.springframework.web.bind.annotation.RequestMapping; import org.springframework.web.bind.annotation.RestController; @RestController @SpringBootApplication public class SpringBootDockerApplication { @RequestMapping("/") public String home() { return "Hello World"; } public static void main(String[] args) { SpringApplication.run(SpringBootDockerApplication.class, args); } }The
SpringbootDockerApplication.javafile starts by declaring yourcom.example.spring_boot_dockerpackage and importing necessary Spring frameworks. This Java file creates a simple Spring Boot web application that responds with "Hello World" when a user visits its homepage.SpringbootDockerApplication.javaファイルは、com.example.spring_boot_dockerパッケージを宣言し、必要なSpringフレームワークをインポートすることから始まります。このJavaファイルは、ユーザーがホームページを訪れると"Hello World"と応答するシンプルなSpring Bootウェブアプリケーションを作成します。
Create the DockerfileDockerfileを作成する
Now that you have the project, you’re ready to create the Dockerfile.プロジェクトができたので、Dockerfileを作成する準備が整いました。
Create a file named
Dockerfilein the same folder that contains all the other folders and files (like src, pom.xml, etc.).他のフォルダやファイル(src、pom.xmlなど)を含む同じフォルダにDockerfileという名前のファイルを作成します。In the
Dockerfile, define your base image by adding the following line:Dockerfile内で、次の行を追加してベースイメージを定義します。FROM eclipse-temurin:21.0.8_9-jdk-jammyNow, define the working directory by using the
WORKDIRinstruction. This will specify where future commands will run and the directory files will be copied inside the container image.次に、WORKDIR命令を使用して作業ディレクトリを定義します。これにより、今後のコマンドが実行される場所と、コンテナイメージ内にファイルがコピーされるディレクトリが指定されます。WORKDIR /appCopy both the Maven wrapper script and your project's
pom.xmlfile into the current working directory/appwithin the Docker container.Mavenラッパースクリプトとプロジェクトのpom.xmlファイルを、Dockerコンテナ内の現在の作業ディレクトリ/appにコピーします。Execute a command within the container. It runs the
./mvnw dependency:go-offlinecommand, which uses the Maven wrapper (./mvnw) to download all dependencies for your project without building the final JAR file (useful for faster builds).コンテナ内でコマンドを実行します。これは、最終的なJARファイルをビルドせずにプロジェクトのすべての依存関係をダウンロードするためにMavenラッパー(./mvnw)を使用して./mvnw dependency:go-offlineコマンドを実行します(ビルドを速くするために便利です)。RUN ./mvnw dependency:go-offlineCopy the
srcdirectory from your project on the host machine to the/appdirectory within the container.ホストマシンのプロジェクトからsrcディレクトリを、コンテナ内の/appディレクトリにコピーします。COPY src ./srcSet the default command to be executed when the container starts. This command instructs the container to run the Maven wrapper (
./mvnw) with thespring-boot:rungoal, which will build and execute your Spring Boot application.コンテナが起動したときに実行されるデフォルトコマンドを設定します。このコマンドは、Mavenラッパー(./mvnw)を使用してspring-boot:runゴールを実行し、Spring Bootアプリケーションをビルドして実行するようにコンテナに指示します。CMD ["./mvnw", "spring-boot:run"]And with that, you should have the following Dockerfile:これで、次のDockerfileが完成するはずです。
Build the container imageコンテナイメージをビルドする
Execute the following command to build the Docker image:次のコマンドを実行してDockerイメージをビルドします:
$ docker build -t spring-helloworld .Check the size of the Docker image by using the
docker imagescommand:docker imagesコマンドを使用してDockerイメージのサイズを確認します:$ docker imagesDoing so will produce output like the following:そうすることで、以下のような出力が得られます:
REPOSITORY          TAG       IMAGE ID       CREATED          SIZE
spring-helloworld   latest    ff708d5ee194   3 minutes ago    880MB
This output shows that your image is 880MB in size. It contains the full JDK, Maven toolchain, and more. In production, you don’t need that in your final image.この出力は、あなたのイメージが880MBのサイズであることを示しています。完全なJDK、Mavenツールチェーンなどが含まれています。本番環境では、最終イメージにそれを含める必要はありません。
Run the Spring Boot applicationSpring Bootアプリケーションを実行する
Now that you have an image built, it's time to run the container.イメージが構築されたので、コンテナを実行する時が来ました。
$ docker run -p 8080:8080 spring-helloworldYou'll then see output similar to the following in the container log:次に、コンテナログに以下のような出力が表示されます:
[INFO] --- spring-boot:3.3.4:run (default-cli) @ spring-boot-docker ---
[INFO] Attaching agents: []

     .   ____          _            __ _ _
    /\\ / ___'_ __ _ _(_)_ __  __ _ \ \ \ \
   ( ( )\___ | '_ | '_| | '_ \/ _` | \ \ \ \
    \\/  ___)| |_)| | | | | || (_| |  ) ) ) )
     '  |____| .__|_| |_|_| |_\__, | / / / /
    =========|_|==============|___/=/_/_/_/

    :: Spring Boot ::                (v3.3.4)

2024-09-29T23:54:07.157Z  INFO 159 --- [spring-boot-docker] [           main]
c.e.s.SpringBootDockerApplication        : Starting SpringBootDockerApplication using Java
21.0.2 with PID 159 (/app/target/classes started by root in /app)
 ….
Access your “Hello World” page through your web browser at http://localhost:8080, or via this curl command:ウェブブラウザで「Hello World」ページにアクセスするには、http://localhost:8080を使用するか、このcurlコマンドを使用してください:
$ curl localhost:8080
Hello World
Use multi-stage buildsマルチステージビルドを使用する
Consider the following Dockerfile:次のDockerfileを考えてみてください:
FROM eclipse-temurin:21.0.8_9-jdk-jammy AS builder
WORKDIR /opt/app
COPY .mvn/ .mvn
COPY mvnw pom.xml ./
RUN ./mvnw dependency:go-offline
COPY ./src ./src
RUN ./mvnw clean install

FROM eclipse-temurin:21.0.8_9-jre-jammy AS final
WORKDIR /opt/app
EXPOSE 8080
COPY --from=builder /opt/app/target/*.jar /opt/app/*.jar
ENTRYPOINT ["java", "-jar", "/opt/app/*.jar"]
Notice that this Dockerfile has been split into two stages.このDockerfileは2つのステージに分割されていることに注意してください。
The first stage remains the same as the previous Dockerfile, providing a Java Development Kit (JDK) environment for building the application. This stage is given the name of builder.最初のステージは前のDockerfileと同じで、アプリケーションをビルドするためのJava Development Kit (JDK)環境を提供します。このステージにはbuilderという名前が付けられています。
The second stage is a new stage named
final. It uses a slimmereclipse-temurin:21.0.2_13-jre-jammyimage, containing just the Java Runtime Environment (JRE) needed to run the application. This image provides a Java Runtime Environment (JRE) which is enough for running the compiled application (JAR file).第二段階は、finalという新しい段階です。これは、アプリケーションを実行するために必要なJava Runtime Environment (JRE)のみを含む、よりスリムなeclipse-temurin:21.0.2_13-jre-jammyイメージを使用します。このイメージは、コンパイルされたアプリケーション(JARファイル)を実行するのに十分なJava Runtime Environment (JRE)を提供します。
For production use, it's highly recommended that you produce a custom JRE-like runtime using jlink. JRE images are available for all versions of Eclipse Temurin, but
jlinkallows you to create a minimal runtime containing only the necessary Java modules for your application. This can significantly reduce the size and improve the security of your final image. Refer to this page for more information.本番環境での使用には、jlinkを使用してカスタムJREライクなランタイムを生成することを強く推奨します。JREイメージはすべてのEclipse Temurinのバージョンで利用可能ですが、jlinkを使用すると、アプリケーションに必要なJavaモジュールのみを含む最小限のランタイムを作成できます。これにより、サイズを大幅に削減し、最終イメージのセキュリティを向上させることができます。このページを参照して、詳細情報をご覧ください。With multi-stage builds, a Docker build uses one base image for compilation, packaging, and unit tests and then a separate image for the application runtime. As a result, the final image is smaller in size since it doesn’t contain any development or debugging tools. By separating the build environment from the final runtime environment, you can significantly reduce the image size and increase the security of your final images.マルチステージビルドを使用すると、Dockerビルドはコンパイル、パッケージング、ユニットテスト用に1つのベースイメージを使用し、アプリケーションランタイム用に別のイメージを使用します。その結果、最終イメージは開発やデバッグツールを含まないため、サイズが小さくなります。ビルド環境と最終ランタイム環境を分離することで、イメージサイズを大幅に削減し、最終イメージのセキュリティを向上させることができます。
Now, rebuild your image and run your ready-to-use production build.さて、イメージを再構築し、使用準備が整った本番ビルドを実行してください。
$ docker build -t spring-helloworld-builder .This command builds a Docker image named
spring-helloworld-builderusing the final stage from yourDockerfilefile located in the current directory.このコマンドは、現在のディレクトリにあるDockerfileファイルから最終段階を使用して、spring-helloworld-builderという名前のDockerイメージをビルドします。NoteIn your multi-stage Dockerfile, the final stage (final) is the default target for building. This means that if you don't explicitly specify a target stage using the
--targetflag in thedocker buildcommand, Docker will automatically build the last stage by default. You could usedocker build -t spring-helloworld-builder --target builder .to build only the builder stage with the JDK environment.マルチステージDockerfileでは、最終段階(final)がビルドのデフォルトターゲットです。これは、docker buildコマンドで--targetフラグを使用してターゲット段階を明示的に指定しない限り、Dockerが自動的に最後の段階をデフォルトでビルドすることを意味します。docker build -t spring-helloworld-builder --target builder .を使用して、JDK環境を持つビルダーステージのみをビルドすることができます。Look at the image size difference by using the
docker imagescommand:次のdocker imagesコマンドを使用して、イメージサイズの違いを確認してください:$ docker imagesYou'll get output similar to the following:次のような出力が得られます:
spring-helloworld-builder latest    c5c76cb815c0   24 minutes ago      428MB
spring-helloworld         latest    ff708d5ee194   About an hour ago   880MB
Your final image is just 428 MB, compared to the original build size of 880 MB.最終イメージはわずか428 MBで、元のビルドサイズ880 MBと比較して大幅に小さくなっています。
By optimizing each stage and only including what's necessary, you were able to significantly reduce the overall image size while still achieving the same functionality. This not only improves performance but also makes your Docker images more lightweight, more secure, and easier to manage.各段階を最適化し、必要なものだけを含めることで、同じ機能を維持しながら全体のイメージサイズを大幅に削減することができました。これにより、パフォーマンスが向上するだけでなく、Dockerイメージがより軽量で、より安全で、管理しやすくなります。