Overriding container defaultsコンテナのデフォルトをオーバーライド
Explanation説明
When a Docker container starts, it executes an application or command. The container gets this executable (script or file) from its image’s configuration. Containers come with default settings that usually work well, but you can change them if needed. These adjustments help the container's program run exactly how you want it to.Docker コンテナが起動すると、アプリケーションまたはコマンドが実行されます。コンテナは、この実行可能ファイル(スクリプトまたはファイル)をイメージの設定から取得します。コンテナには通常うまく機能するデフォルト設定が付属していますが、必要に応じて変更することができます。これらの調整により、コンテナのプログラムを正確に希望通りに実行することができます。
For example, if you have an existing database container that listens on the standard port and you want to run a new instance of the same database container, then you might want to change the port settings the new container listens on so that it doesn’t conflict with the existing container. Sometimes you might want to increase the memory available to the container if the program needs more resources to handle a heavy workload or set the environment variables to provide specific configuration details the program needs to function properly.たとえば、標準ポートでリッスンしている既存のデータベースコンテナがあり、同じデータベースコンテナの新しいインスタンスを実行したい場合、新しいコンテナがリッスンするポート設定を変更して、既存のコンテナと競合しないようにすることがあります。プログラムが重い負荷を処理するためにより多くのリソースを必要とする場合、コンテナに利用可能なメモリを増やしたり、プログラムが正常に機能するために必要な特定の設定詳細を提供するために環境変数を設定したりすることもあります。
The docker run command offers a powerful way to override these defaults and tailor the container's behavior to your liking. The command offers several flags that let you to customize container behavior on the fly.この docker run コマンドは、これらのデフォルトを上書きし、コンテナの動作を好みに合わせて調整する強力な方法を提供します。このコマンドは、コンテナの動作をその場でカスタマイズできるいくつかのフラグを提供します。
Here's a few ways you can achieve this.これを達成するためのいくつかの方法を紹介します。
Overriding the network portsネットワークポートの上書き
Sometimes you might want to use separate database instances for development and testing purposes. Running these database instances on the same port might conflict. You can use the -p option in docker run to map container ports to host ports, allowing you to run the multiple instances of the container without any conflict.時には、開発とテストの目的で別々のデータベースインスタンスを使用したい場合があります。これらのデータベースインスタンスを同じポートで実行すると競合する可能性があります。docker run の -p オプションを使用して、コンテナポートをホストポートにマッピングすることで、競合なしに複数のインスタンスのコンテナを実行できます。
$ docker run -d -p HOST_PORT:CONTAINER_PORT postgres
Setting environment variables環境変数の設定
This option sets an environment variable foo inside the container with the value bar.このオプションは、コンテナ内に値 bar を持つ環境変数 foo を設定します。
$ docker run -e foo=bar postgres env
You will see output like the following:次のような出力が表示されます:
HOSTNAME=2042f2e6ebe4
foo=bar
TipThe
.envfile acts as a convenient way to set environment variables for your Docker containers without cluttering your command line with numerous-eflags. To use a.envfile, you can pass--env-fileoption with thedocker runcommand..envファイルは、数多くの-eフラグでコマンドラインを混雑させることなく、Docker コンテナの環境変数を設定する便利な方法として機能します。.envファイルを使用するには、docker runコマンドに--env-fileオプションを渡すことができます。$ docker run --env-file .env postgres env
Restricting the container to consume the resourcesリソースを消費するためのコンテナの制限
You can use the --memory and --cpus flags with the docker run command to restrict how much CPU and memory a container can use. For example, you can set a memory limit for the Python API container, preventing it from consuming excessive resources on your host. Here's the command:コンテナが使用できるCPUとメモリの量を制限するために、docker runコマンドで--memoryおよび--cpusフラグを使用できます。たとえば、Python APIコンテナのメモリ制限を設定することで、ホスト上で過剰なリソースを消費するのを防ぐことができます。コマンドは次のとおりです:
$ docker run -e POSTGRES_PASSWORD=secret --memory="512m" --cpus="0.5" postgres
This command limits container memory usage to 512 MB and defines the CPU quota of 0.5 for half a core.このコマンドは、コンテナのメモリ使用量を512 MBに制限し、CPUクォータを0.5(半コア)に設定します。
Monitor the real-time resource usageリアルタイムのリソース使用状況を監視する
You can use the
docker statscommand to monitor the real-time resource usage of running containers. This helps you understand whether the allocated resources are sufficient or need adjustment.docker statsコマンドを使用して、実行中のコンテナのリアルタイムのリソース使用状況を監視できます。これにより、割り当てられたリソースが十分か、調整が必要かを理解するのに役立ちます。
By effectively using these docker run flags, you can tailor your containerized application's behavior to fit your specific requirements.これらのdocker runフラグを効果的に使用することで、コンテナ化されたアプリケーションの動作を特定の要件に合わせて調整できます。
Try it out試してみる
In this hands-on guide, you'll see how to use the docker run command to override the container defaults.このハンズオンガイドでは、docker runコマンドを使用してコンテナのデフォルトをオーバーライドする方法を示します。
- Download and install Docker Desktop.Docker Desktopをダウンロードしてインストールします。
Run multiple instances of the Postgres databasePostgresデータベースの複数インスタンスを実行する
Start a container using the Postgres image with the following command:Postgresイメージを使用してコンテナを開始するには、次のコマンドを実行します:
$ docker run -d -e POSTGRES_PASSWORD=secret -p 5432:5432 postgresThis will start the Postgres database in the background, listening on the standard container port
5432and mapped to port5432on the host machine.これにより、Postgresデータベースがバックグラウンドで起動し、標準のコンテナポート5432でリッスンし、ホストマシンのポート5432にマッピングされます。Start a second Postgres container mapped to a different port.異なるポートにマッピングされた2つ目のPostgresコンテナを開始します。
$ docker run -d -e POSTGRES_PASSWORD=secret -p 5433:5432 postgresThis will start another Postgres container in the background, listening on the standard postgres port
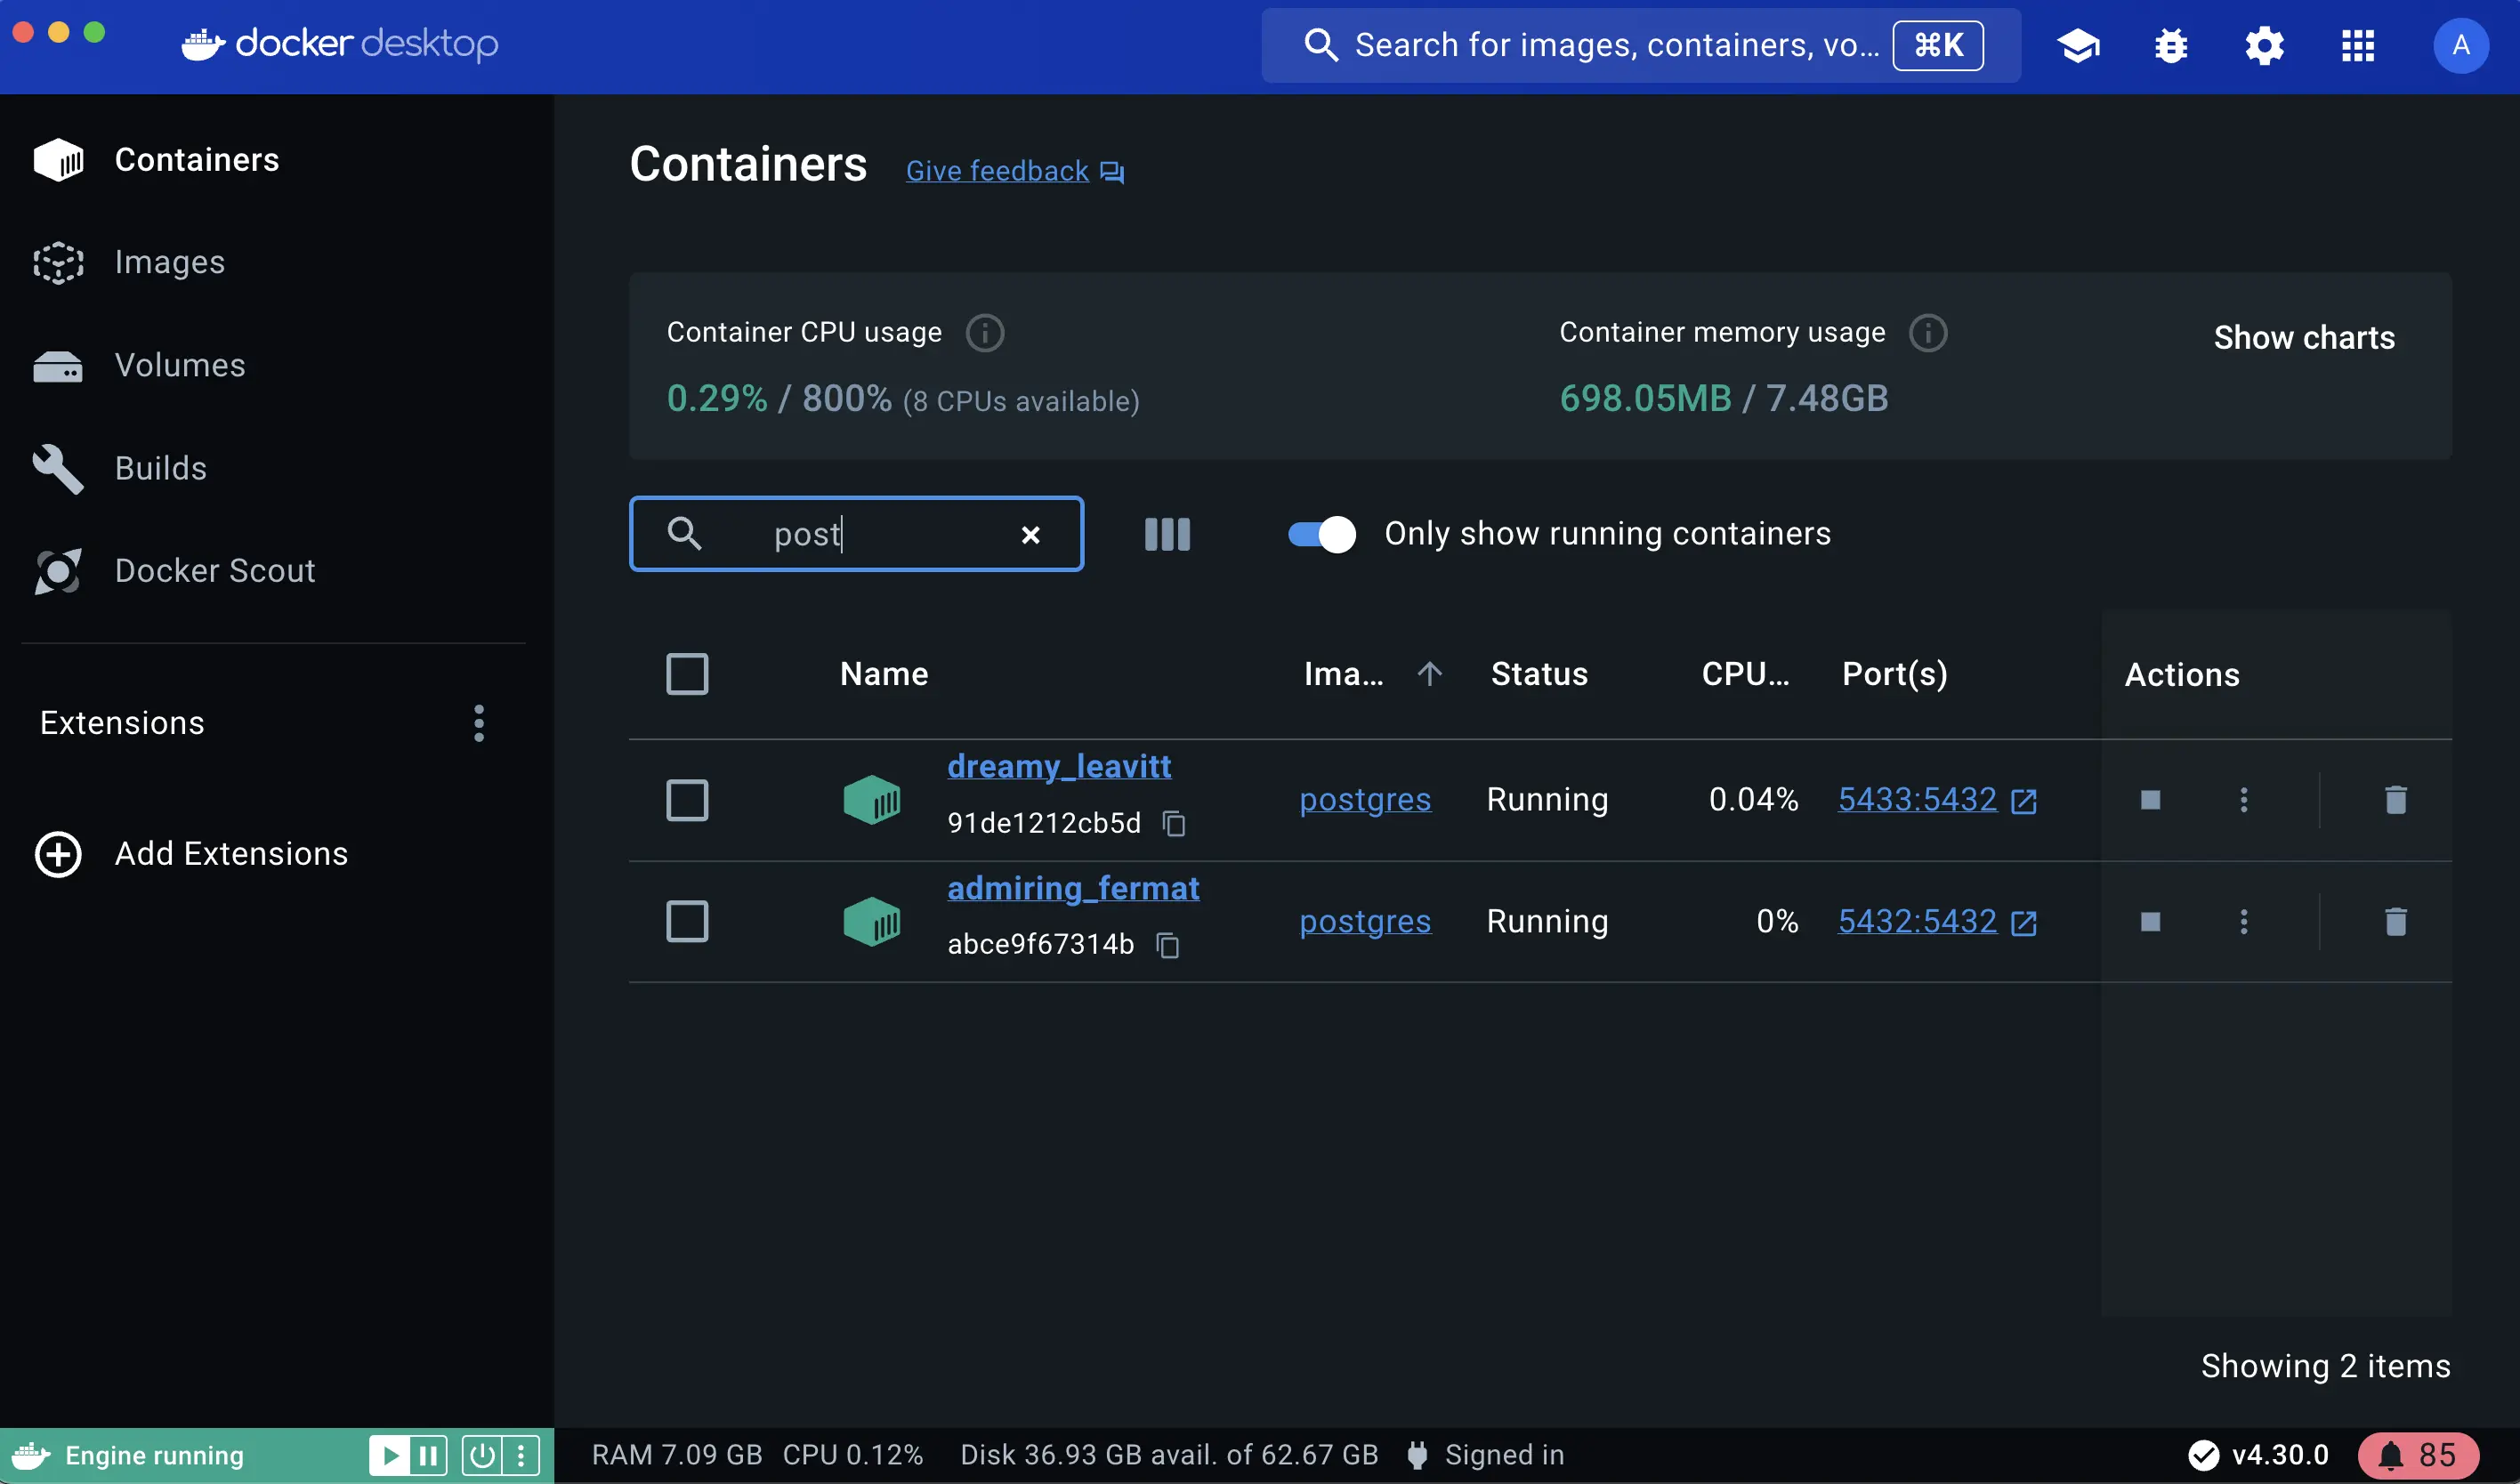
5432in the container, but mapped to port5433on the host machine. You override the host port just to ensure that this new container doesn't conflict with the existing running container.これにより、バックグラウンドで別のPostgresコンテナが起動し、コンテナ内の標準Postgresポート5432でリッスンしますが、ホストマシンのポート5433にマッピングされます。この新しいコンテナが既存の実行中のコンテナと競合しないように、ホストポートを上書きします。Verify that both containers are running by going to the Containers view in the Docker Desktop Dashboard.Docker Desktop DashboardのContainersビューに移動して、両方のコンテナが実行中であることを確認します。
Run Postgres container in a controlled network制御されたネットワークでPostgresコンテナを実行する
By default, containers automatically connect to a special network called a bridge network when you run them. This bridge network acts like a virtual bridge, allowing containers on the same host to communicate with each other while keeping them isolated from the outside world and other hosts. It's a convenient starting point for most container interactions. However, for specific scenarios, you might want more control over the network configuration.デフォルトでは、コンテナは実行時にブリッジネットワークと呼ばれる特別なネットワークに自動的に接続されます。このブリッジネットワークは仮想ブリッジのように機能し、同じホスト上のコンテナ同士が通信できるようにしつつ、外部世界や他のホストからは隔離されます。これはほとんどのコンテナの相互作用にとって便利な出発点です。しかし、特定のシナリオでは、ネットワーク構成をより制御したい場合があります。
Here's where the custom network comes in. You create a custom network by passing --network flag with the docker run command. All containers without a --network flag are attached to the default bridge network.ここでカスタムネットワークが登場します。docker runコマンドに--networkフラグを渡すことでカスタムネットワークを作成します。--networkフラグがないすべてのコンテナは、デフォルトのブリッジネットワークに接続されます。
Follow the steps to see how to connect a Postgres container to a custom network.Postgresコンテナをカスタムネットワークに接続する方法を確認するための手順に従ってください。
Create a new custom network by using the following command:次のコマンドを使用して新しいカスタムネットワークを作成します:
$ docker network create mynetworkVerify the network by running the following command:次のコマンドを実行してネットワークを確認します:
$ docker network lsThis command lists all networks, including the newly created "mynetwork".このコマンドは、新しく作成された"mynetwork"を含むすべてのネットワークをリストします。
Connect Postgres to the custom network by using the following command:以下のコマンドを使用して、Postgresをカスタムネットワークに接続します。
$ docker run -d -e POSTGRES_PASSWORD=secret -p 5434:5432 --network mynetwork postgresThis will start Postgres container in the background, mapped to the host port 5434 and attached to the
mynetworknetwork. You passed the--networkparameter to override the container default by connecting the container to custom Docker network for better isolation and communication with other containers. You can usedocker network inspectcommand to see if the container is tied to this new bridge network.これにより、Postgresコンテナがバックグラウンドで起動し、ホストポート5434にマッピングされ、mynetworkネットワークに接続されます。コンテナをカスタムDockerネットワークに接続するために--networkパラメータを渡して、他のコンテナとのより良い隔離と通信を実現しました。docker network inspectコマンドを使用して、コンテナがこの新しいブリッジネットワークに接続されているかどうかを確認できます。Key difference between default bridge and custom networksデフォルトのブリッジとカスタムネットワークの主な違い
- DNS resolution: By default, containers connected to the default bridge network can communicate with each other, but only by IP address. (unless you use
--linkoption which is considered legacy). It is not recommended for production use due to the various technical shortcomings. On a custom network, containers can resolve each other by name or alias.DNS解決: デフォルトでは、デフォルトのブリッジネットワークに接続されたコンテナは互いに通信できますが、IPアドレスのみで通信します。(--linkオプションを使用しない限り、これはレガシーと見なされます)。さまざまな技術的な欠点があるため、プロダクションでの使用は推奨されません。カスタムネットワークでは、コンテナは名前またはエイリアスで互いに解決できます。 - Isolation: All containers without a
--networkspecified are attached to the default bridge network, hence can be a risk, as unrelated containers are then able to communicate. Using a custom network provides a scoped network in which only containers attached to that network are able to communicate, hence providing better isolation.隔離:--networkが指定されていないすべてのコンテナはデフォルトのブリッジネットワークに接続されるため、無関係なコンテナが通信できるリスクがあります。カスタムネットワークを使用すると、そのネットワークに接続されたコンテナのみが通信できるスコープ付きのネットワークが提供され、より良い隔離が実現されます。
- DNS resolution: By default, containers connected to the default bridge network can communicate with each other, but only by IP address. (unless you use
Manage the resourcesリソースを管理する
By default, containers are not limited in their resource usage. However, on shared systems, it's crucial to manage resources effectively. It's important not to let a running container consume too much of the host machine's memory.デフォルトでは、コンテナのリソース使用は制限されていません。しかし、共有システムでは、リソースを効果的に管理することが重要です。実行中のコンテナがホストマシンのメモリを過剰に消費しないようにすることが重要です。
This is where the docker run command shines again. It offers flags like --memory and --cpus to restrict how much CPU and memory a container can use.ここで、docker runコマンドが再び活躍します。--memoryや--cpusのようなフラグを提供して、コンテナが使用できるCPUとメモリの量を制限します。
$ docker run -d -e POSTGRES_PASSWORD=secret --memory="512m" --cpus=".5" postgres
The --cpus flag specifies the CPU quota for the container. Here, it's set to half a CPU core (0.5) whereas the --memory flag specifies the memory limit for the container. In this case, it's set to 512 MB.--cpusフラグは、コンテナのCPUクォータを指定します。ここでは、半分のCPUコア(0.5)に設定されており、--memoryフラグはコンテナのメモリ制限を指定します。この場合、512 MBに設定されています。
Override the default CMD and ENTRYPOINT in Docker ComposeDocker ComposeでデフォルトのCMDとENTRYPOINTをオーバーライドする
Sometimes, you might need to override the default commands (CMD) or entry points (ENTRYPOINT) defined in a Docker image, especially when using Docker Compose.時には、Dockerイメージで定義されたデフォルトのコマンド(CMD)やエントリポイント(ENTRYPOINT)をオーバーライドする必要があるかもしれません。特にDocker Composeを使用する場合において。
Create a
compose.ymlfile with the following content:compose.ymlファイルを以下の内容で作成します:services: postgres: image: postgres entrypoint: ["docker-entrypoint.sh", "postgres"] command: ["-h", "localhost", "-p", "5432"] environment: POSTGRES_PASSWORD: secretThe Compose file defines a service named
postgresthat uses the official Postgres image, sets an entrypoint script, and starts the container with password authentication.Composeファイルは、公式のPostgresイメージを使用し、エントリポイントスクリプトを設定し、パスワード認証でコンテナを起動するpostgresという名前のサービスを定義します。Bring up the service by running the following command:次のコマンドを実行してサービスを起動します:
$ docker compose up -dThis command starts the Postgres service defined in the Docker Compose file.このコマンドは、Docker Composeファイルで定義されたPostgresサービスを起動します。
Verify the authentication with Docker Desktop Dashboard.Docker Desktop Dashboardで認証を確認します。
Open the Docker Desktop Dashboard, select the Postgres container and select Exec to enter into the container shell. You can type the following command to connect to the Postgres database:Docker Desktop Dashboardを開き、Postgresコンテナを選択し、Execを選択してコンテナシェルに入ります。次のコマンドを入力してPostgresデータベースに接続できます:
# psql -U postgres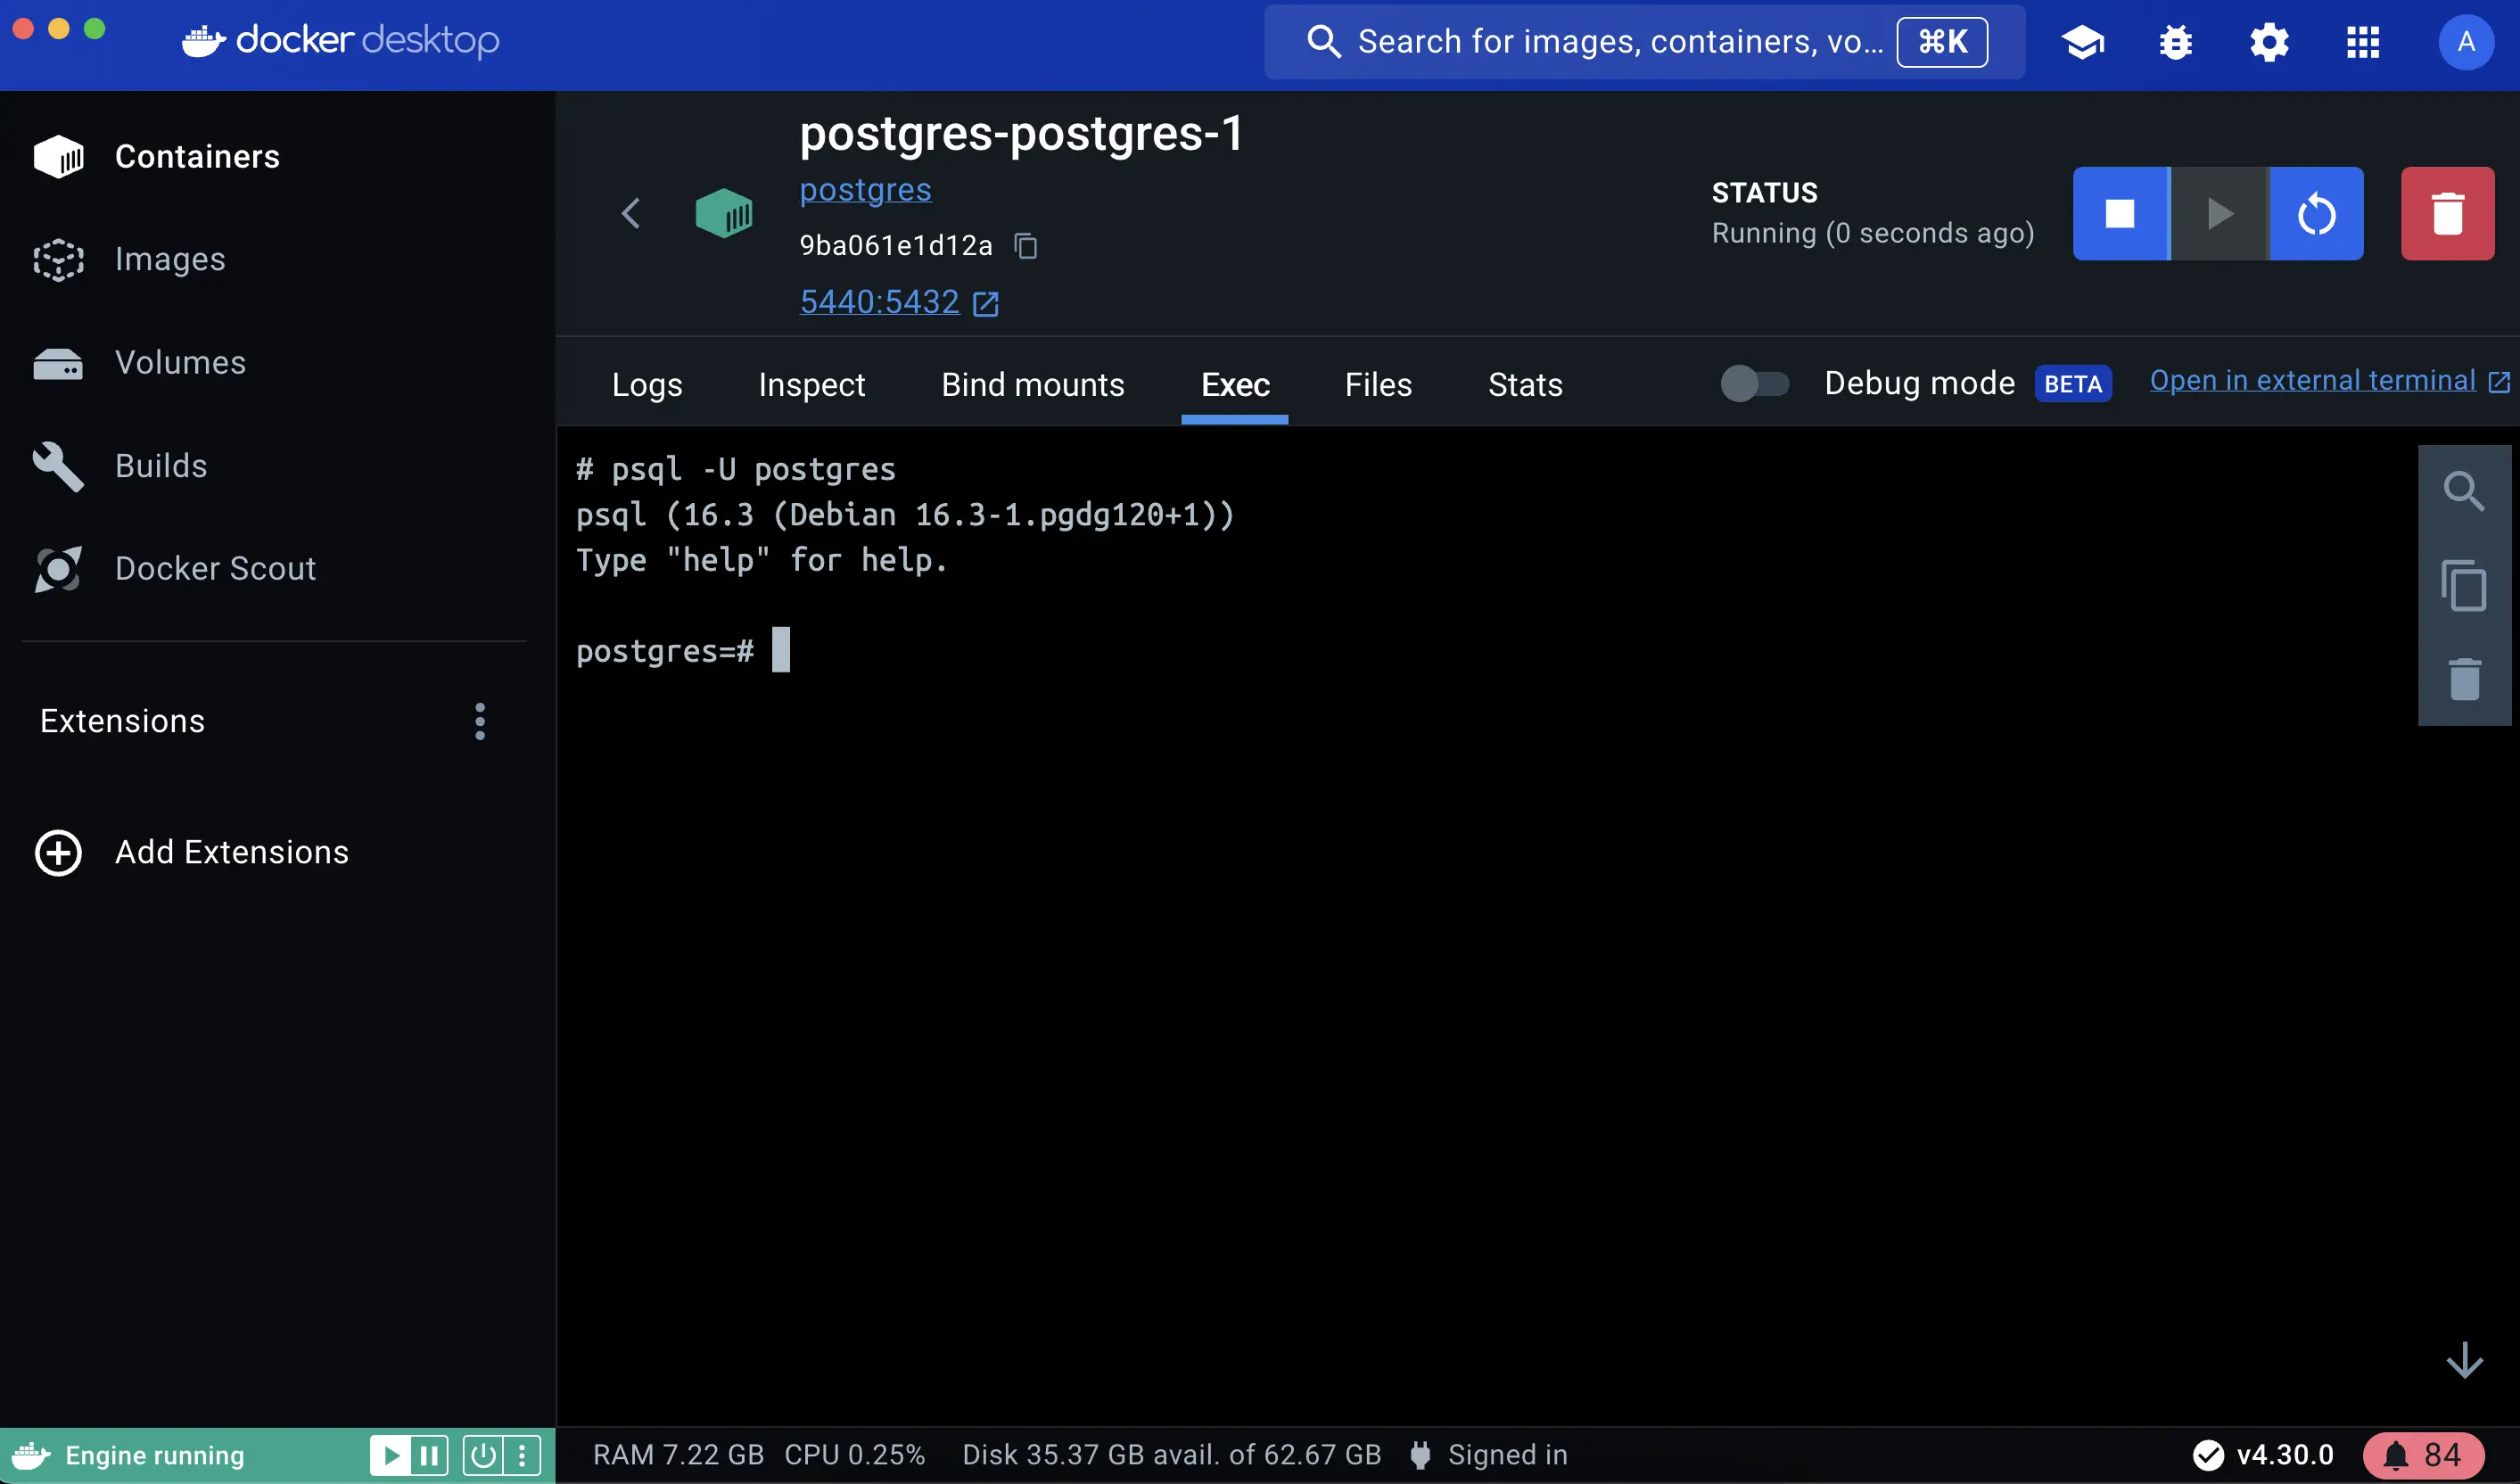 Note
NoteThe PostgreSQL image sets up trust authentication locally so you may notice a password isn't required when connecting from localhost (inside the same container). However, a password will be required if connecting from a different host/container.PostgreSQLイメージはローカルでトラスト認証を設定するため、localhost(同じコンテナ内)から接続する際にパスワードが不要であることに気付くかもしれません。しかし、異なるホスト/コンテナから接続する場合はパスワードが必要になります。
Override the default CMD and ENTRYPOINT with docker rundocker runでデフォルトのCMDとENTRYPOINTをオーバーライドする
You can also override defaults directly using the docker run command with the following command:次のコマンドを使用して、docker runコマンドでデフォルトを直接オーバーライドすることもできます:
$ docker run -e POSTGRES_PASSWORD=secret postgres docker-entrypoint.sh -h localhost -p 5432
This command runs a Postgres container, sets an environment variable for password authentication, overrides the default startup commands and configures hostname and port mapping.このコマンドはPostgresコンテナを実行し、パスワード認証のための環境変数を設定し、デフォルトの起動コマンドをオーバーライドし、ホスト名とポートのマッピングを構成します。
Additional resources追加リソース
Next steps次のステップ
Now that you have learned about overriding container defaults, it's time to learn how to persist container data.コンテナのデフォルトをオーバーライドする方法を学んだので、次はコンテナデータを永続化する方法を学ぶ時です。
Persisting container data