Understanding the image layersイメージレイヤーの理解
Explanation説明
As you learned in What is an image?, container images are composed of layers. And each of these layers, once created, are immutable. But, what does that actually mean? And how are those layers used to create the filesystem a container can use?あなたがイメージとは何か?で学んだように、コンテナイメージはレイヤーで構成されています。そして、これらのレイヤーは一度作成されると不変です。しかし、それは実際に何を意味するのでしょうか?そして、これらのレイヤーはコンテナが使用できるファイルシステムを作成するためにどのように使用されるのでしょうか?
Image layersイメージレイヤー
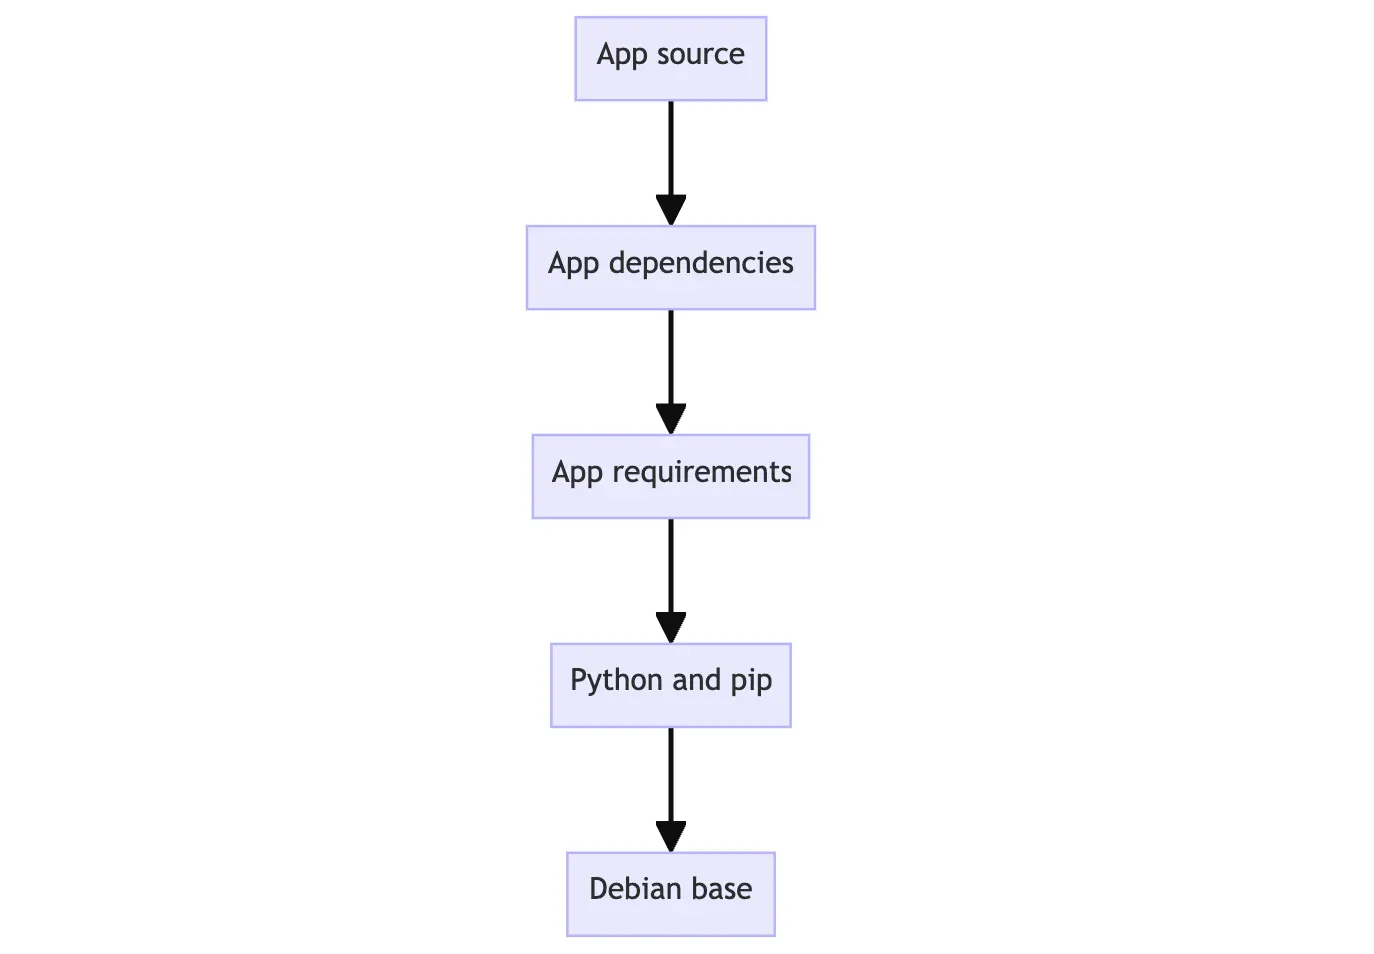
Each layer in an image contains a set of filesystem changes - additions, deletions, or modifications. Let’s look at a theoretical image:イメージ内の各レイヤーは、ファイルシステムの変更セット - 追加、削除、または修正 - を含んでいます。理論的なイメージを見てみましょう:
- The first layer adds basic commands and a package manager, such as apt.最初のレイヤーは、基本的なコマンドとaptのようなパッケージマネージャーを追加します。
- The second layer installs a Python runtime and pip for dependency management.第二層は、Pythonランタイムと依存関係管理のためのpipをインストールします。
- The third layer copies in an application’s specific requirements.txt file.第三層は、アプリケーションの特定のrequirements.txtファイルをコピーします。
- The fourth layer installs that application’s specific dependencies.第四層は、そのアプリケーションの特定の依存関係をインストールします。
- The fifth layer copies in the actual source code of the application.第五層は、アプリケーションの実際のソースコードをコピーします。
This example might look like:この例は次のようになります:
This is beneficial because it allows layers to be reused between images. For example, imagine you wanted to create another Python application. Due to layering, you can leverage the same Python base. This will make builds faster and reduce the amount of storage and bandwidth required to distribute the images. The image layering might look similar to the following:これは、レイヤーを画像間で再利用できるため、有益です。たとえば、別のPythonアプリケーションを作成したいと想像してみてください。レイヤリングのおかげで、同じPythonベースを活用できます。これにより、ビルドが速くなり、画像を配布するために必要なストレージと帯域幅の量が減ります。画像のレイヤリングは次のように見えるかもしれません:
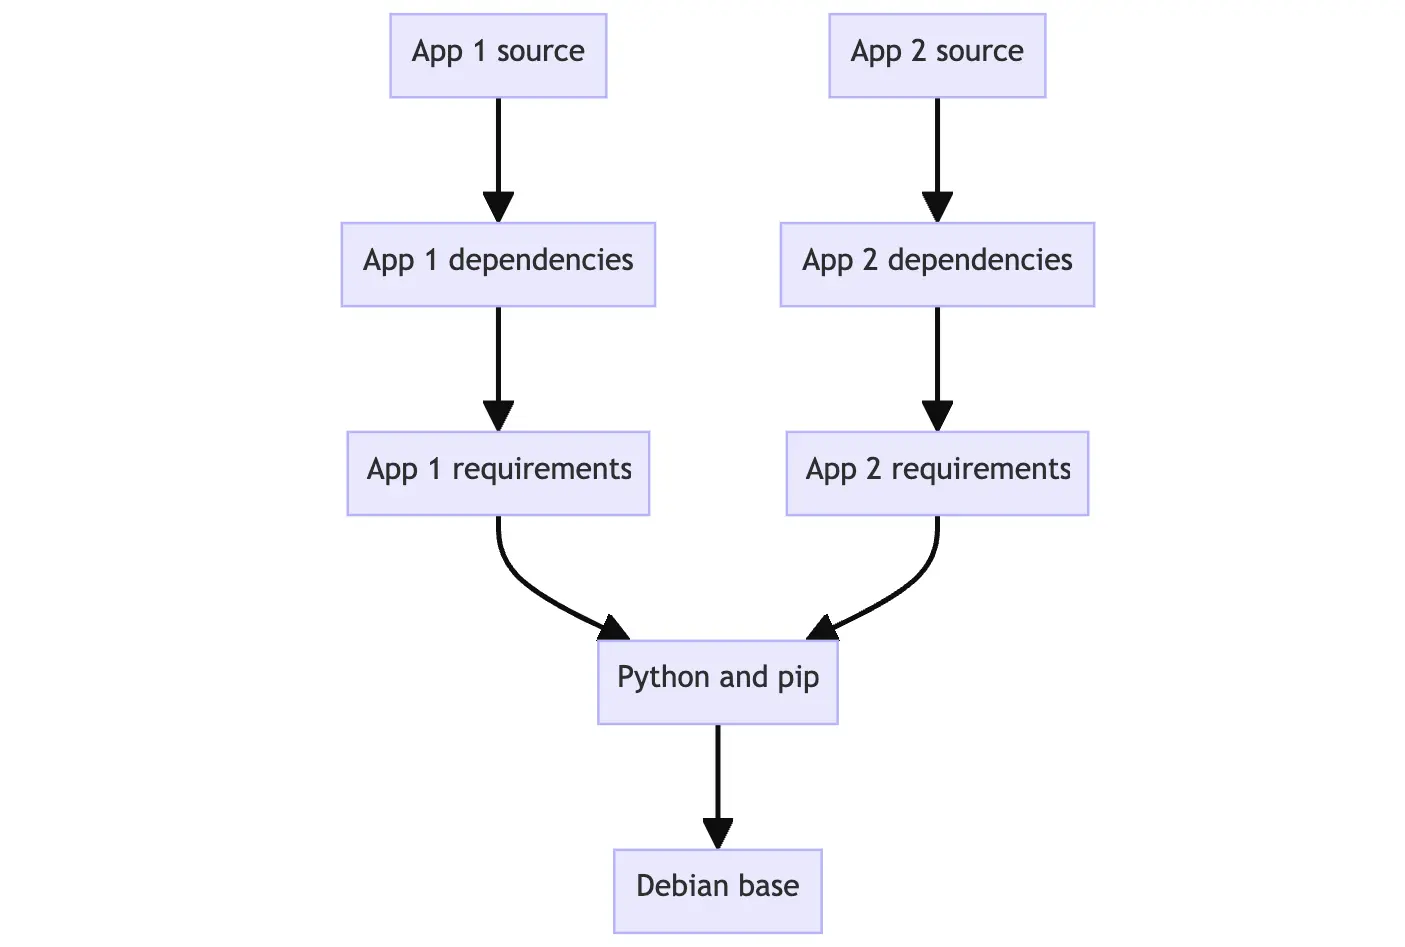
Layers let you extend images of others by reusing their base layers, allowing you to add only the data that your application needs.レイヤーを使用すると、他の画像のベースレイヤーを再利用して画像を拡張でき、アプリケーションに必要なデータのみを追加できます。
Stacking the layersレイヤーのスタッキング
Layering is made possible by content-addressable storage and union filesystems. While this will get technical, here’s how it works:レイヤリングは、コンテンツアドレス可能ストレージとユニオンファイルシステムによって可能になります。これは技術的になりますが、次のように機能します:
- After each layer is downloaded, it is extracted into its own directory on the host filesystem.各レイヤーがダウンロードされると、それはホストファイルシステムの独自のディレクトリに抽出されます。
- When you run a container from an image, a union filesystem is created where layers are stacked on top of each other, creating a new and unified view.イメージからコンテナを実行すると、レイヤーが重ねられたユニオンファイルシステムが作成され、新しい統一されたビューが生成されます。
- When the container starts, its root directory is set to the location of this unified directory, using
chroot.コンテナが起動すると、そのルートディレクトリはこの統一ディレクトリの場所に設定され、chrootが使用されます。
When the union filesystem is created, in addition to the image layers, a directory is created specifically for the running container. This allows the container to make filesystem changes while allowing the original image layers to remain untouched. This enables you to run multiple containers from the same underlying image.ユニオンファイルシステムが作成されると、イメージレイヤーに加えて、実行中のコンテナ専用のディレクトリが作成されます。これにより、コンテナはファイルシステムの変更を行うことができ、元のイメージレイヤーはそのまま保持されます。これにより、同じ基盤となるイメージから複数のコンテナを実行することが可能になります。
Try it out試してみる
In this hands-on guide, you will create new image layers manually using the docker container commit command. Note that you’ll rarely create images this way, as you’ll normally use a Dockerfile. But, it makes it easier to understand how it’s all working.このハンズオンガイドでは、docker container commitコマンドを使用して、新しいイメージレイヤーを手動で作成します。この方法でイメージを作成することはほとんどありませんが、通常はDockerfileを使用します。しかし、これにより全体の仕組みを理解しやすくなります。
Create a base imageベースイメージを作成する
In this first step, you will create your own base image that you will then use for the following steps.この最初のステップでは、次のステップで使用する独自のベースイメージを作成します。
Download and install Docker Desktop.Docker Desktopをダウンロードしてインストールします。
In a terminal, run the following command to start a new container:ターミナルで、次のコマンドを実行して新しいコンテナを起動します:
$ docker run --name=base-container -ti ubuntuOnce the image has been downloaded and the container has started, you should see a new shell prompt. This is running inside your container. It will look similar to the following (the container ID will vary):イメージがダウンロードされ、コンテナが起動すると、新しいシェルプロンプトが表示されます。これはコンテナ内で実行されています。以下のように見えるはずです(コンテナIDは異なる場合があります):
root@d8c5ca119fcd:/#Inside the container, run the following command to install Node.js:コンテナ内で、次のコマンドを実行してNode.jsをインストールします:
$ apt update && apt install -y nodejsWhen this command runs, it downloads and installs Node inside the container. In the context of the union filesystem, these filesystem changes occur within the directory unique to this container.このコマンドが実行されると、コンテナ内にNodeがダウンロードされ、インストールされます。ユニオンファイルシステムの文脈では、これらのファイルシステムの変更はこのコンテナ専用のディレクトリ内で発生します。
Validate if Node is installed by running the following command:Nodeがインストールされているか確認するには、次のコマンドを実行します:
$ node -e 'console.log("Hello world!")'You should then see a “Hello world!” appear in the console.コンソールに「Hello world!」が表示されるはずです。
Now that you have Node installed, you’re ready to save the changes you’ve made as a new image layer, from which you can start new containers or build new images. To do so, you will use the
docker container commitcommand. Run the following command in a new terminal:Nodeがインストールされたので、変更を新しいイメージレイヤーとして保存する準備が整いました。これにより、新しいコンテナを開始したり、新しいイメージをビルドしたりできます。そのためには、docker container commitコマンドを使用します。新しいターミナルで次のコマンドを実行してください:$ docker container commit -m "Add node" base-container node-baseView the layers of your image using the
docker image historycommand:docker image historyコマンドを使用して、イメージのレイヤーを表示します:$ docker image history node-baseYou will see output similar to the following:次のような出力が表示されます:
IMAGE          CREATED          CREATED BY                                      SIZE      COMMENT
d5c1fca2cdc4   10 seconds ago   /bin/bash                                       126MB     Add node
2b7cc08dcdbb   5 weeks ago      /bin/sh -c #(nop)  CMD ["/bin/bash"]            0B
<missing>      5 weeks ago      /bin/sh -c #(nop) ADD file:07cdbabf782942af0…   69.2MB
<missing>      5 weeks ago      /bin/sh -c #(nop)  LABEL org.opencontainers.…   0B
<missing>      5 weeks ago      /bin/sh -c #(nop)  LABEL org.opencontainers.…   0B
<missing>      5 weeks ago      /bin/sh -c #(nop)  ARG LAUNCHPAD_BUILD_ARCH     0B
<missing>      5 weeks ago      /bin/sh -c #(nop)  ARG RELEASE                  0B
Note the “Add node” comment on the top line. This layer contains the Node.js install you just made.最上行の「Add node」コメントに注意してください。このレイヤーには、先ほどインストールしたNode.jsが含まれています。
To prove your image has Node installed, you can start a new container using this new image:イメージにNodeがインストールされていることを証明するために、この新しいイメージを使用して新しいコンテナを起動できます:
$ docker run node-base node -e "console.log('Hello again')"With that, you should get a “Hello again” output in the terminal, showing Node was installed and working.これで、ターミナルに「Hello again」という出力が表示され、Nodeがインストールされて動作していることが確認できます。
Now that you’re done creating your base image, you can remove that container:ベースイメージの作成が完了したので、そのコンテナを削除できます:
$ docker rm -f base-container
Base image definitionベースイメージの定義
A base image is a foundation for building other images. It's possible to use any images as a base image. However, some images are intentionally created as building blocks, providing a foundation or starting point for an application.ベースイメージは、他のイメージを構築するための基盤です。任意のイメージをベースイメージとして使用することが可能です。ただし、一部のイメージは意図的にビルディングブロックとして作成されており、アプリケーションの基盤や出発点を提供します。
In this example, you probably won’t deploy this
node-baseimage, as it doesn’t actually do anything yet. But it’s a base you can use for other builds.この例では、おそらくこのnode-baseイメージをデプロイすることはないでしょう。なぜなら、まだ実際には何も行っていないからです。しかし、これは他のビルドに使用できるベースです。
Build an app imageアプリイメージをビルドする
Now that you have a base image, you can extend that image to build additional images.ベースイメージがあるので、そのイメージを拡張して追加のイメージを構築できます。
Start a new container using the newly created node-base image:新しく作成した node-base イメージを使用して新しいコンテナを開始します:
$ docker run --name=app-container -ti node-baseInside of this container, run the following command to create a Node program:このコンテナ内で、次のコマンドを実行して Node プログラムを作成します:
$ echo 'console.log("Hello from an app")' > app.jsTo run this Node program, you can use the following command and see the message printed on the screen:この Node プログラムを実行するには、次のコマンドを使用して画面にメッセージを表示させることができます:
$ node app.jsIn another terminal, run the following command to save this container’s changes as a new image:別のターミナルで、次のコマンドを実行してこのコンテナの変更を新しいイメージとして保存します:
$ docker container commit -c "CMD node app.js" -m "Add app" app-container sample-appThis command not only creates a new image named
sample-app, but also adds additional configuration to the image to set the default command when starting a container. In this case, you are setting it to automatically runnode app.js.このコマンドは、sample-appという名前の新しいイメージを作成するだけでなく、コンテナを起動する際のデフォルトコマンドを設定するためにイメージに追加の構成を加えます。この場合、node app.jsを自動的に実行するように設定しています。In a terminal outside of the container, run the following command to view the updated layers:コンテナの外にあるターミナルで、更新されたレイヤーを表示するために次のコマンドを実行します:
$ docker image history sample-appYou’ll then see output that looks like the following. Note the top layer comment has “Add app” and the next layer has “Add node”:次に、以下のような出力が表示されます。最上層のコメントには「Add app」があり、次の層には「Add node」があります。
IMAGE          CREATED              CREATED BY                                      SIZE      COMMENT
c1502e2ec875   About a minute ago   /bin/bash                                       33B       Add app
5310da79c50a   4 minutes ago        /bin/bash                                       126MB     Add node
2b7cc08dcdbb   5 weeks ago          /bin/sh -c #(nop)  CMD ["/bin/bash"]            0B
<missing>      5 weeks ago          /bin/sh -c #(nop) ADD file:07cdbabf782942af0…   69.2MB
<missing>      5 weeks ago          /bin/sh -c #(nop)  LABEL org.opencontainers.…   0B
<missing>      5 weeks ago          /bin/sh -c #(nop)  LABEL org.opencontainers.…   0B
<missing>      5 weeks ago          /bin/sh -c #(nop)  ARG LAUNCHPAD_BUILD_ARCH     0B
<missing>      5 weeks ago          /bin/sh -c #(nop)  ARG RELEASE                  0B
Finally, start a new container using the brand new image. Since you specified the default command, you can use the following command:最後に、新しいイメージを使用して新しいコンテナを起動します。デフォルトのコマンドを指定したので、次のコマンドを使用できます:
$ docker run sample-appYou should see your greeting appear in the terminal, coming from your Node program.ターミナルにあなたの挨拶が表示されるはずです。それはあなたのNodeプログラムからのものです。
Now that you’re done with your containers, you can remove them using the following command:コンテナの作業が完了したので、次のコマンドを使用してそれらを削除できます:
$ docker rm -f app-container
Additional resources追加リソース
If you’d like to dive deeper into the things you learned, check out the following resources:学んだことをさらに深く掘り下げたい場合は、以下のリソースをチェックしてください:
Next steps次のステップ
As hinted earlier, most image builds don’t use docker container commit. Instead, you’ll use a Dockerfile which automates these steps for you.前述のように、ほとんどのイメージビルドはdocker container commitを使用しません。代わりに、これらのステップを自動化するDockerfileを使用します。