Sharing local files with containersコンテナとのローカルファイルの共有
Explanation説明
Each container has everything it needs to function with no reliance on any pre-installed dependencies on the host machine. Since containers run in isolation, they have minimal influence on the host and other containers. This isolation has a major benefit: containers minimize conflicts with the host system and other containers. However, this isolation also means containers can't directly access data on the host machine by default.各コンテナは、ホストマシンに事前にインストールされた依存関係に依存せずに機能するために必要なすべてを持っています。コンテナは隔離された環境で実行されるため、ホストや他のコンテナに対する影響は最小限です。この隔離には大きな利点があります。コンテナはホストシステムや他のコンテナとの競合を最小限に抑えます。しかし、この隔離は、コンテナがデフォルトでホストマシン上のデータに直接アクセスできないことも意味します。
Consider a scenario where you have a web application container that requires access to configuration settings stored in a file on your host system. This file may contain sensitive data such as database credentials or API keys. Storing such sensitive information directly within the container image poses security risks, especially during image sharing. To address this challenge, Docker offers storage options that bridge the gap between container isolation and your host machine's data.ホストシステム上のファイルに保存された設定設定にアクセスする必要があるウェブアプリケーションコンテナのシナリオを考えてみてください。このファイルには、データベースの認証情報やAPIキーなどの機密データが含まれている可能性があります。このような機密情報をコンテナイメージ内に直接保存することは、特にイメージの共有中にセキュリティリスクを伴います。この課題に対処するために、Dockerはコンテナの隔離とホストマシンのデータとの間のギャップを埋めるストレージオプションを提供しています。
Docker offers two primary storage options for persisting data and sharing files between the host machine and containers: volumes and bind mounts.Dockerは、データを永続化し、ホストマシンとコンテナ間でファイルを共有するための2つの主要なストレージオプションを提供しています:ボリュームとバインドマウントです。
Volume versus bind mountsボリュームとバインドマウントの違い
If you want to ensure that data generated or modified inside the container persists even after the container stops running, you would opt for a volume. See Persisting container data to learn more about volumes and their use cases.コンテナ内で生成または変更されたデータが、コンテナが停止した後も持続することを保証したい場合は、ボリュームを選択します。ボリュームとその使用例について詳しくは、コンテナデータの永続化を参照してください。
If you have specific files or directories on your host system that you want to directly share with your container, like configuration files or development code, then you would use a bind mount. It's like opening a direct portal between your host and container for sharing. Bind mounts are ideal for development environments where real-time file access and sharing between the host and container are crucial.ホストシステム上の特定のファイルやディレクトリをコンテナと直接共有したい場合、例えば設定ファイルや開発コードなどは、バインドマウントを使用します。これは、ホストとコンテナ間で共有するための直接的なポータルを開くようなものです。バインドマウントは、リアルタイムのファイルアクセスとホストとコンテナ間の共有が重要な開発環境に最適です。
Sharing files between a host and containerホストとコンテナ間のファイル共有
Both -v (or --volume) and --mount flags used with the docker run command let you share files or directories between your local machine (host) and a Docker container. However, there are some key differences in their behavior and usage.両方の -v (または --volume) と --mount フラグは、docker run コマンドと共に使用され、ローカルマシン(ホスト)とDockerコンテナ間でファイルやディレクトリを共有することができます。ただし、動作や使用法にはいくつかの重要な違いがあります。
The -v flag is simpler and more convenient for basic volume or bind mount operations. If the host location doesn’t exist when using -v or --volume, a directory will be automatically created.-v フラグは、基本的なボリュームまたはバインドマウント操作に対してよりシンプルで便利です。-v または --volume を使用する際にホストの場所が存在しない場合、自動的にディレクトリが作成されます。
Imagine you're a developer working on a project. You have a source directory on your development machine where your code resides. When you compile or build your code, the generated artifacts (compiled code, executables, images, etc.) are saved in a separate subdirectory within your source directory. In the following examples, this subdirectory is /HOST/PATH. Now you want these build artifacts to be accessible within a Docker container running your application. Additionally, you want the container to automatically access the latest build artifacts whenever you rebuild your code.あなたがプロジェクトに取り組んでいる開発者だと想像してください。あなたの開発マシンには、コードが存在するソースディレクトリがあります。コードをコンパイルまたはビルドすると、生成されたアーティファクト(コンパイルされたコード、実行可能ファイル、イメージなど)は、ソースディレクトリ内の別のサブディレクトリに保存されます。以下の例では、このサブディレクトリは /HOST/PATH です。今、これらのビルドアーティファクトが、あなたのアプリケーションを実行しているDockerコンテナ内でアクセス可能であることを望んでいます。さらに、コードを再ビルドするたびに、コンテナが最新のビルドアーティファクトに自動的にアクセスできるようにしたいです。
Here's a way to use docker run to start a container using a bind mount and map it to the container file location.以下は、docker run を使用してバインドマウントを利用し、コンテナのファイル位置にマッピングする方法です。
$ docker run -v /HOST/PATH:/CONTAINER/PATH -it nginx
The --mount flag offers more advanced features and granular control, making it suitable for complex mount scenarios or production deployments. If you use --mount to bind-mount a file or directory that doesn't yet exist on the Docker host, the docker run command doesn't automatically create it for you but generates an error.--mount フラグは、より高度な機能と細かな制御を提供し、複雑なマウントシナリオや本番環境でのデプロイメントに適しています。もし --mount を使用して、まだ存在しないファイルやディレクトリを Docker ホストにバインドマウントしようとすると、docker run コマンドは自動的にそれを作成せず、エラーを生成します。
$ docker run --mount type=bind,source=/HOST/PATH,target=/CONTAINER/PATH,readonly nginx
NoteDocker recommends using the
--mountsyntax instead of-v. It provides better control over the mounting process and avoids potential issues with missing directories.Docker は--mount構文の使用を推奨しています。これは、マウントプロセスに対するより良い制御を提供し、ディレクトリが欠落していることによる潜在的な問題を回避します。
File permissions for Docker access to host filesホストファイルへの Docker アクセスのためのファイル権限
When using bind mounts, it's crucial to ensure that Docker has the necessary permissions to access the host directory. To grant read/write access, you can use the :ro flag (read-only) or :rw (read-write) with the -v or --mount flag during container creation.
For example, the following command grants read-write access permission.バインドマウントを使用する際は、Docker がホストディレクトリにアクセスするための必要な権限を持っていることを確認することが重要です。読み取り/書き込みアクセスを付与するには、コンテナ作成時に -v または --mount フラグと共に :ro フラグ(読み取り専用)または :rw(読み書き可能)を使用できます。
例えば、以下のコマンドは読み書きアクセス権を付与します。
$ docker run -v HOST-DIRECTORY:/CONTAINER-DIRECTORY:rw nginx
Read-only bind mounts let the container access the mounted files on the host for reading, but it can't change or delete the files. With read-write bind mounts, containers can modify or delete mounted files, and these changes or deletions will also be reflected on the host system. Read-only bind mounts ensures that files on the host can't be accidentally modified or deleted by a container.読み取り専用のバインドマウントは、コンテナがホスト上のマウントされたファイルに対して読み取りアクセスを許可しますが、ファイルを変更したり削除したりすることはできません。読み書き可能なバインドマウントでは、コンテナがマウントされたファイルを変更または削除でき、これらの変更や削除はホストシステムにも反映されます。読み取り専用のバインドマウントは、ホスト上のファイルがコンテナによって誤って変更または削除されることを防ぎます。
Synchronized File Share同期ファイル共有
As your codebase grows larger, traditional methods of file sharing like bind mounts may become inefficient or slow, especially in development environments where frequent access to files is necessary. Synchronized file shares improve bind mount performance by leveraging synchronized filesystem caches. This optimization ensures that file access between the host and virtual machine (VM) is fast and efficient.コードベースが大きくなるにつれて、バインドマウントのような従来のファイル共有方法は、特にファイルへの頻繁なアクセスが必要な開発環境では非効率的または遅くなる可能性があります。 同期ファイル共有 は、同期ファイルシステムキャッシュを活用することでバインドマウントのパフォーマンスを向上させます。この最適化により、ホストと仮想マシン(VM)間のファイルアクセスが迅速かつ効率的になります。
Try it out試してみる
In this hands-on guide, you’ll practice how to create and use a bind mount to share files between a host and a container.このハンズオンガイドでは、ホストとコンテナ間でファイルを共有するためのバインドマウントを作成し使用する方法を実践します。
Run a containerコンテナを実行する
Download and install Docker Desktop.Docker Desktopをダウンロードしてインストールします。
Start a container using the httpd image with the following command:次のコマンドを使用して、httpd イメージを使用してコンテナを起動します:
$ docker run -d -p 8080:80 --name my_site httpd:2.4This will start the
httpdservice in the background, and publish the webpage to port8080on the host.これにより、httpdサービスがバックグラウンドで開始され、ホストのポート8080にウェブページが公開されます。Open the browser and access http://localhost:8080 or use the curl command to verify if it's working fine or not.ブラウザを開いて、http://localhost:8080にアクセスするか、curlコマンドを使用して正常に動作しているか確認してください。
$ curl localhost:8080
Use a bind mountバインドマウントを使用する
Using a bind mount, you can map the configuration file on your host computer to a specific location within the container. In this example, you’ll see how to change the look and feel of the webpage by using bind mount:バインドマウントを使用すると、ホストコンピュータ上の設定ファイルをコンテナ内の特定の場所にマッピングできます。この例では、バインドマウントを使用してウェブページの外観を変更する方法を示します。
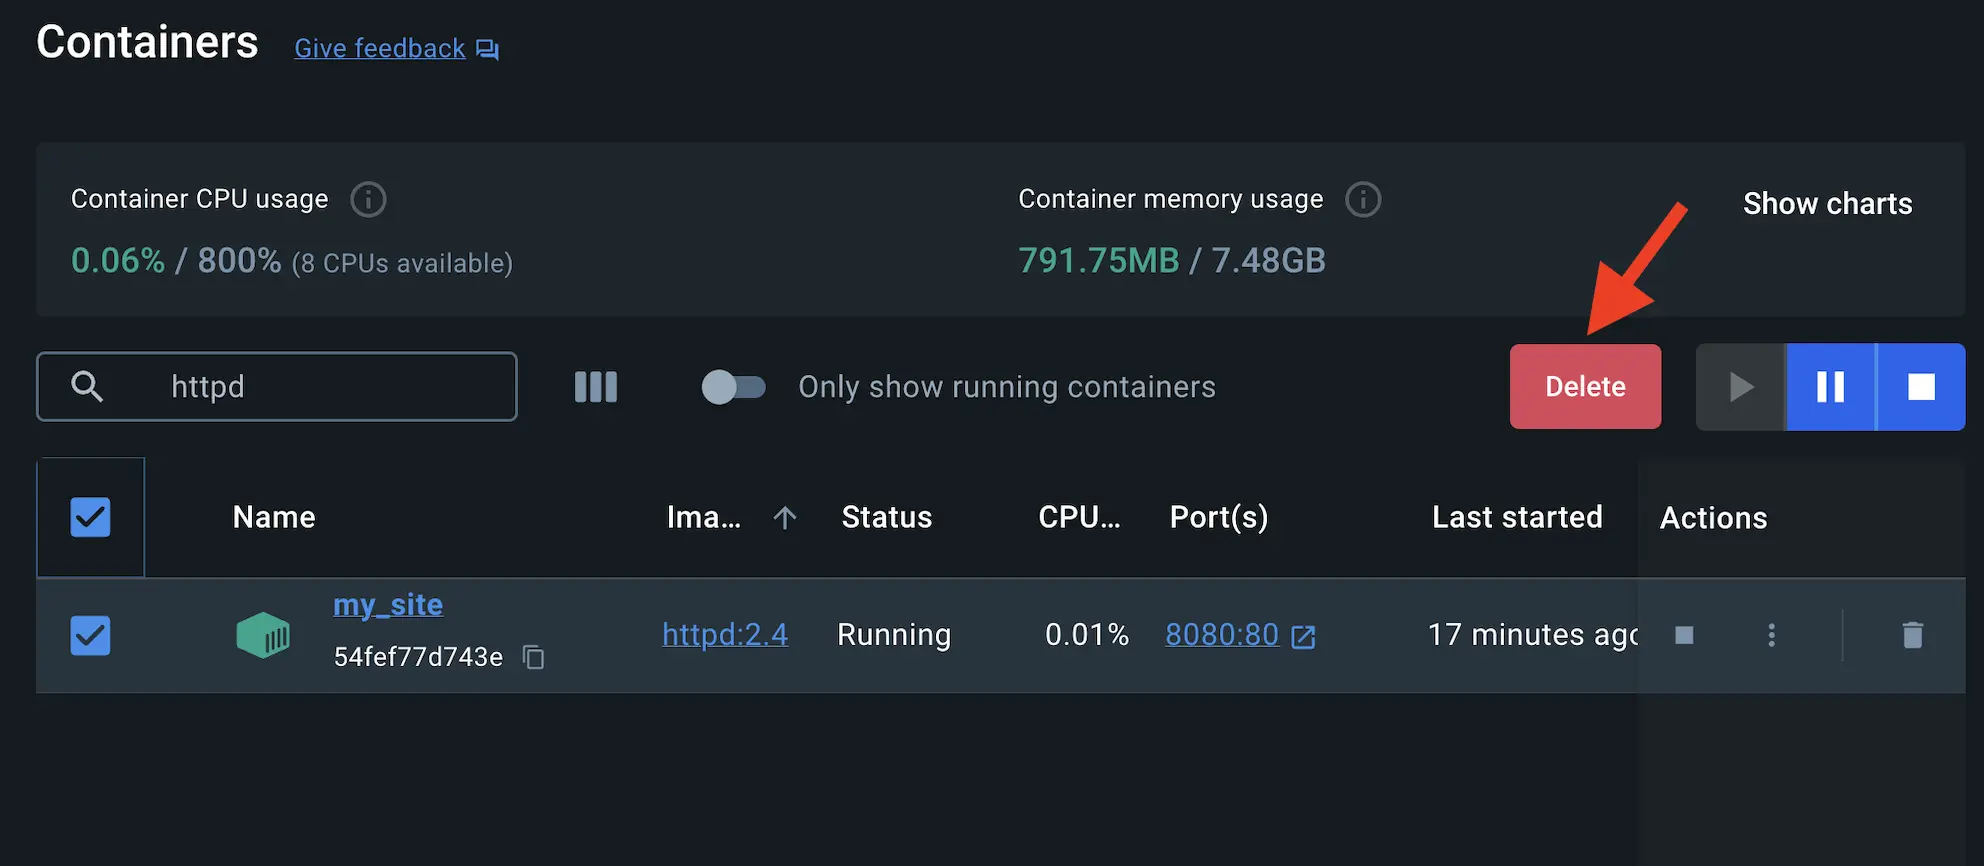
Delete the existing container by using the Docker Desktop Dashboard:Docker Desktop Dashboardを使用して、既存のコンテナを削除します。
Create a new directory called
public_htmlon your host system.ホストシステムにpublic_htmlという新しいディレクトリを作成します。$ mkdir public_htmlNavigate into the newly created directory
public_htmland create a file calledindex.htmlwith the following content. This is a basic HTML document that creates a simple webpage that welcomes you with a friendly whale.新しく作成したディレクトリpublic_htmlに移動し、次の内容を持つindex.htmlというファイルを作成します。これは、フレンドリーなクジラであなたを歓迎するシンプルなウェブページを作成する基本的なHTMLドキュメントです。<!DOCTYPE html> <html lang="en"> <head> <meta charset="UTF-8"> <title> My Website with a Whale & Docker!</title> </head> <body> <h1>Whalecome!!</h1> <p>Look! There's a friendly whale greeting you!</p> <pre id="docker-art"> ## . ## ## ## == ## ## ## ## ## === /"""""""""""""""""\___/ === { / ===- \______ O __/ \ \ __/ \____\_______/ Hello from Docker! </pre> </body> </html>It's time to run the container. The
--mountand-vexamples produce the same result. You can't run them both unless you remove themy_sitecontainer after running the first one.コンテナを実行する時間です。--mountと-vの例は同じ結果を生み出します。最初のものを実行した後にmy_siteコンテナを削除しない限り、両方を実行することはできません。$ docker run -d --name my_site -p 8080:80 -v .:/usr/local/apache2/htdocs/ httpd:2.4$ docker run -d --name my_site -p 8080:80 --mount type=bind,source=./,target=/usr/local/apache2/htdocs/ httpd:2.4TipWhen using the
-vor--mountflag in Windows PowerShell, you need to provide the absolute path to your directory instead of just./. This is because PowerShell handles relative paths differently from bash (commonly used in Mac and Linux environments).Windows PowerShellで-vまたは--mountフラグを使用する場合は、単に./の代わりにディレクトリへの絶対パスを提供する必要があります。これは、PowerShellが相対パスをbash(一般的にMacやLinux環境で使用される)とは異なる方法で処理するためです。With everything now up and running, you should be able to access the site via http://localhost:8080 and find a new webpage that welcomes you with a friendly whale.すべてが正常に動作しているので、http://localhost:8080を介してサイトにアクセスし、フレンドリーなクジラであなたを歓迎する新しいウェブページを見つけることができるはずです。
Access the file on the Docker Desktop DashboardDocker Desktop Dashboardでファイルにアクセスする
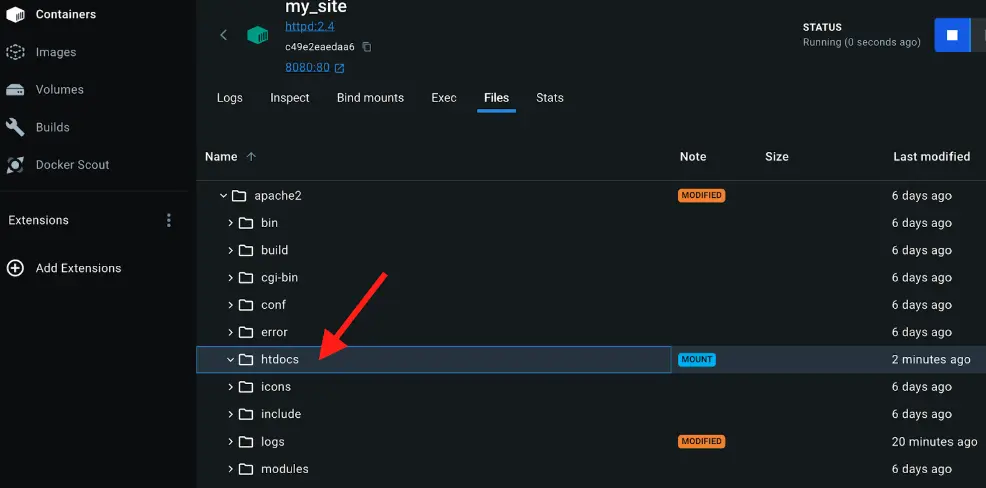
You can view the mounted files inside a container by selecting the container's Files tab and then selecting a file inside the
/usr/local/apache2/htdocs/directory. Then, select Open file editor.コンテナ内のマウントされたファイルは、コンテナの Files タブを選択し、次に/usr/local/apache2/htdocs/ディレクトリ内のファイルを選択することで表示できます。その後、Open file editor を選択します。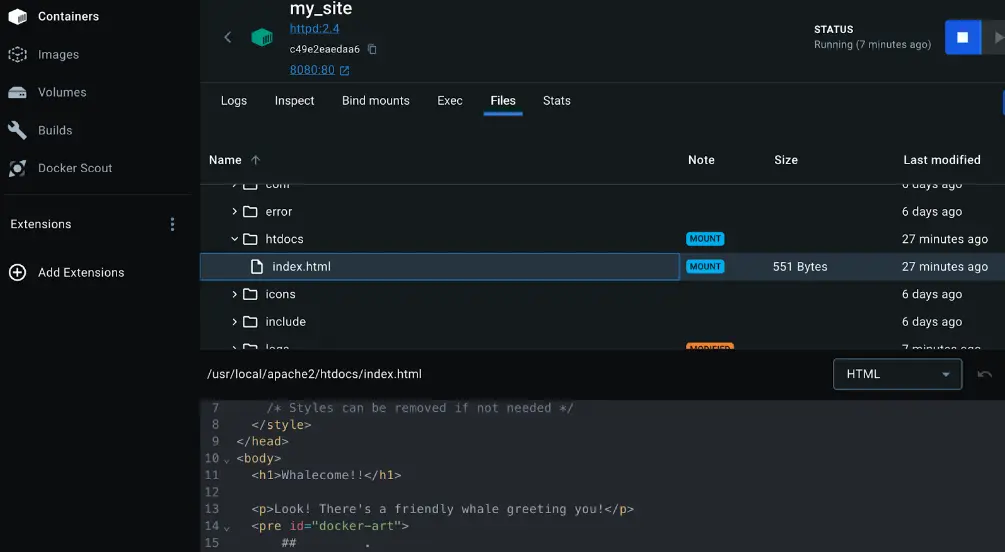
Delete the file on the host and verify the file is also deleted in the container. You will find that the files no longer exist under Files in the Docker Desktop Dashboard.ホスト上のファイルを削除し、コンテナ内でもファイルが削除されていることを確認します。Docker Desktop Dashboardの Files にはファイルが存在しなくなっていることがわかります。
Recreate the HTML file on the host system and see that file re-appears under the Files tab under Containers on the Docker Desktop Dashboard. By now, you will be able to access the site too.ホストシステム上でHTMLファイルを再作成し、Docker Desktop Dashboardの Containers の Files タブにファイルが再表示されることを確認します。これで、サイトにもアクセスできるようになります。
Stop your containerコンテナを停止する
The container continues to run until you stop it.コンテナは、停止するまで実行され続けます。
Go to the Containers view in the Docker Desktop Dashboard.Docker Desktop Dashboardの Containers ビューに移動します。
Locate the container you'd like to stop.停止したいコンテナを見つけます。
Select the Stop action in the Actions column.アクション列で Stop アクションを選択します。
Additional resources追加リソース
The following resources will help you learn more about bind mounts:以下のリソースは、バインドマウントについてさらに学ぶのに役立ちます:
- Manage data in DockerDockerでのデータ管理
- Volumesボリューム
- Bind mountsバインドマウント
- Running containersコンテナの実行
- Troubleshoot storage errorsストレージエラーのトラブルシューティング
- Persisting container dataコンテナデータの永続化
Next steps次のステップ
Now that you have learned about sharing local files with containers, it’s time to learn about multi-container applications.ローカルファイルをコンテナと共有する方法を学んだので、次はマルチコンテナアプリケーションについて学ぶ時です。
Multi-container applications