Containerize an applicationアプリケーションをコンテナ化する
For the rest of this guide, you'll be working with a simple todo list manager that runs on Node.js. If you're not familiar with Node.js, don't worry. This guide doesn't require any prior experience with JavaScript.このガイドの残りの部分では、Node.js上で動作するシンプルなtodoリストマネージャーを使用します。Node.jsに不慣れな場合でも心配はいりません。このガイドではJavaScriptの事前経験は必要ありません。
Prerequisites前提条件
- You have installed the latest version of Docker Desktop.最新バージョンのDocker Desktopをインストールしました。
- You have installed a Git client.Gitクライアントをインストールしました。
- You have an IDE or a text editor to edit files. Docker recommends using Visual Studio Code.ファイルを編集するためのIDEまたはテキストエディタがあります。DockerはVisual Studio Codeの使用を推奨しています。
Get the appアプリを取得する
Before you can run the application, you need to get the application source code onto your machine.アプリケーションを実行する前に、アプリケーションのソースコードをマシンに取得する必要があります。
Clone the getting-started-app repository using the following command:getting-started-appリポジトリを次のコマンドを使用してクローンします:
$ git clone https://github.com/docker/getting-started-app.gitView the contents of the cloned repository. You should see the following files and sub-directories.クローンしたリポジトリの内容を表示します。以下のファイルとサブディレクトリが表示されるはずです。
├── getting-started-app/
│ ├── .dockerignore
│ ├── package.json
│ ├── README.md
│ ├── spec/
│ ├── src/
│ └── yarn.lock
Build the app's imageアプリのイメージをビルドする
To build the image, you'll need to use a Dockerfile. A Dockerfile is simply a text-based file with no file extension that contains a script of instructions. Docker uses this script to build a container image.イメージをビルドするには、Dockerfileを使用する必要があります。Dockerfileは、拡張子のないテキストベースのファイルで、指示のスクリプトが含まれています。Dockerはこのスクリプトを使用してコンテナイメージをビルドします。
In the
getting-started-appdirectory, the same location as thepackage.jsonfile, create a file namedDockerfilewith the following contents:package.jsonファイルと同じ場所にあるgetting-started-appディレクトリで、次の内容を持つDockerfileという名前のファイルを作成します:This Dockerfile starts off with a
node:lts-alpinebase image, a light-weight Linux image that comes with Node.js and the Yarn package manager pre-installed. It copies all of the source code into the image, installs the necessary dependencies, and starts the application.このDockerfileは、node:lts-alpineベースイメージから始まり、Node.jsとYarnパッケージマネージャーが事前にインストールされた軽量Linuxイメージです。ソースコードをすべてイメージにコピーし、必要な依存関係をインストールし、アプリケーションを起動します。Build the image using the following commands:次のコマンドを使用してイメージをビルドします:
In the terminal, make sure you're in the
getting-started-appdirectory. Replace/path/to/getting-started-appwith the path to yourgetting-started-appdirectory.ターミナルで、getting-started-appディレクトリにいることを確認してください。/path/to/getting-started-appをあなたのgetting-started-appディレクトリへのパスに置き換えます。$ cd /path/to/getting-started-appBuild the image.イメージをビルドします。
$ docker build -t getting-started .The
docker buildcommand uses the Dockerfile to build a new image. You might have noticed that Docker downloaded a lot of "layers". This is because you instructed the builder that you wanted to start from thenode:lts-alpineimage. But, since you didn't have that on your machine, Docker needed to download the image.docker buildコマンドはDockerfileを使用して新しいイメージをビルドします。Dockerが多くの「レイヤー」をダウンロードしたことに気づいたかもしれません。これは、node:lts-alpineイメージから始めるようにビルダーに指示したためです。しかし、あなたのマシンにそれがなかったため、Dockerはそのイメージをダウンロードする必要がありました。After Docker downloaded the image, the instructions from the Dockerfile copied in your application and used
yarnto install your application's dependencies. TheCMDdirective specifies the default command to run when starting a container from this image.Dockerがイメージをダウンロードした後、Dockerfileからの指示があなたのアプリケーションにコピーされ、yarnを使用してアプリケーションの依存関係がインストールされました。CMDディレクティブは、このイメージからコンテナを起動する際に実行されるデフォルトのコマンドを指定します。Finally, the
-tflag tags your image. Think of this as a human-readable name for the final image. Since you named the imagegetting-started, you can refer to that image when you run a container.最後に、-tフラグはあなたのイメージにタグを付けます。これは最終的なイメージの人間が読みやすい名前と考えてください。あなたがイメージにgetting-startedという名前を付けたので、コンテナを実行する際にそのイメージを参照できます。The
.at the end of thedocker buildcommand tells Docker that it should look for theDockerfilein the current directory.docker buildコマンドの最後の.は、Dockerに現在のディレクトリでDockerfileを探すように指示します。
Start an app containerアプリコンテナを起動する
Now that you have an image, you can run the application in a container using the docker run command.イメージができたので、docker runコマンドを使用してコンテナ内でアプリケーションを実行できます。
Run your container using the
docker runcommand and specify the name of the image you just created:docker runコマンドを使用してコンテナを実行し、先ほど作成したイメージの名前を指定します:$ docker run -d -p 127.0.0.1:3000:3000 getting-startedThe
-dflag (short for--detach) runs the container in the background. This means that Docker starts your container and returns you to the terminal prompt. Also, it does not display logs in the terminal.-dフラグ(--detachの短縮形)は、コンテナをバックグラウンドで実行します。 これは、Dockerがコンテナを起動し、ターミナルプロンプトに戻ることを意味します。 また、ターミナルにログを表示しません。The
-pflag (short for--publish) creates a port mapping between the host and the container. The-pflag takes a string value in the format ofHOST:CONTAINER, whereHOSTis the address on the host, andCONTAINERis the port on the container. The command publishes the container's port 3000 to127.0.0.1:3000(localhost:3000) on the host. Without the port mapping, you wouldn't be able to access the application from the host.-pフラグ(--publishの短縮形)は、ホストとコンテナの間にポートマッピングを作成します。-pフラグは、HOST:CONTAINERの形式の文字列値を取ります。ここで、HOSTはホスト上のアドレスで、CONTAINERはコンテナ上のポートです。このコマンドは、コンテナのポート3000をホストの127.0.0.1:3000(localhost:3000)に公開します。ポートマッピングがなければ、ホストからアプリケーションにアクセスすることはできません。After a few seconds, open your web browser to http://localhost:3000. You should see your app.数秒後、ウェブブラウザを開いてhttp://localhost:3000にアクセスしてください。 あなたのアプリが表示されるはずです。

Add an item or two and see that it works as you expect. You can mark items as complete and remove them. Your frontend is successfully storing items in the backend.アイテムを1つか2つ追加して、期待通りに動作するか確認してください。アイテムを完了としてマークし、削除することができます。あなたのフロントエンドはバックエンドにアイテムを正常に保存しています。
At this point, you have a running todo list manager with a few items.この時点で、いくつかのアイテムを持つ実行中のtodoリストマネージャーがあります。
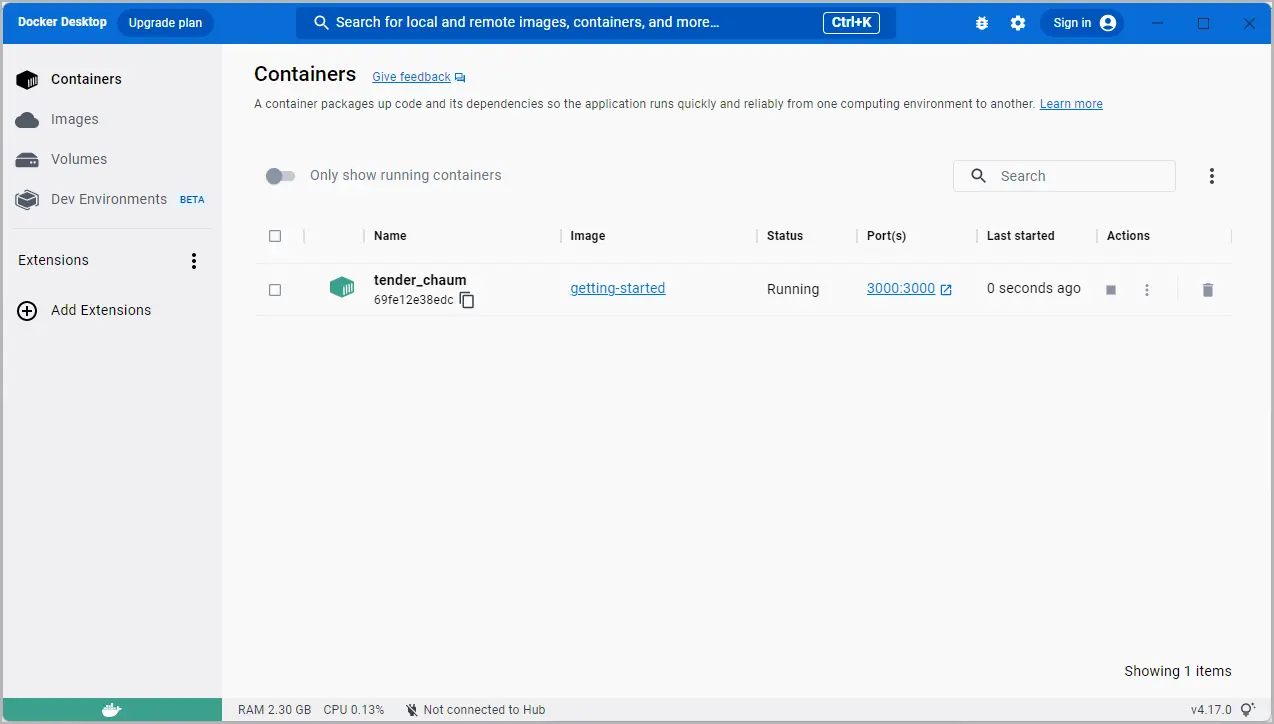
If you take a quick look at your containers, you should see at least one container running that's using the getting-started image and on port 3000. To see your containers, you can use the CLI or Docker Desktop's graphical interface.コンテナを少し確認すると、少なくとも1つのコンテナが getting-started イメージを使用してポート 3000 で実行されているのが見えるはずです。コンテナを確認するには、CLIまたはDocker Desktopのグラフィカルインターフェースを使用できます。
Run the docker ps command in a terminal to list your containers.ターミナルで docker ps コマンドを実行して、コンテナの一覧を表示します。
$ docker ps
Output similar to the following should appear.以下のような出力が表示されるはずです。
CONTAINER ID        IMAGE               COMMAND                  CREATED             STATUS              PORTS                      NAMES
df784548666d        getting-started     "docker-entrypoint.s…"   2 minutes ago       Up 2 minutes        127.0.0.1:3000->3000/tcp   priceless_mcclintock
In Docker Desktop, select the Containers tab to see a list of your containers.Docker Desktopでは、Containers タブを選択して、コンテナの一覧を確認します。
Summary概要
In this section, you learned the basics about creating a Dockerfile to build an image. Once you built an image, you started a container and saw the running app.このセクションでは、イメージをビルドするためのDockerfileの作成についての基本を学びました。イメージをビルドした後、コンテナを起動し、実行中のアプリを確認しました。
Related information:関連情報:
Next steps次のステップ
Next, you're going to make a modification to your app and learn how to update your running application with a new image. Along the way, you'll learn a few other useful commands.次に、アプリに変更を加え、新しいイメージで実行中のアプリケーションを更新する方法を学びます。その過程で、いくつかの便利なコマンドも学ぶことができます。
Update the application